> ## Documentation Index
> Fetch the complete documentation index at: https://support.getskara.ai/llms.txt
> Use this file to discover all available pages before exploring further.
# Android SDK - Installation
Install Skara Chat SDK to communicate with your Customer on your Android app. Salesmate Chat for Android supports API 21 and above. [Click here to learn about navigation to Android - Installation in Salesmate.](#login-a-user)
**Note:** We recommend using the latest available `compileSdkVersion`.
### **Topics covered:**
* [Install Skara Chat SDK](#install-salesmate-chat-sdk)
* [Initialize Skara Chat](#initialize-salesmate-chat)
* [Login a User](#login-a-user)
* [How to Logout a User](#how-to-logout-a-user)
### Install Skara Chat SDK
If you’re new to Salesmate Chat, you’ll need to [Configure the Skara Chat](https://support.salesmate.io/hc/en-us/articles/360058369732) in your Skara account. Then you have three options:
* Option 1: Install Skara Chat SDK with Firebase Cloud Messaging (FCM)
Add the following dependency to your app's `build.gradle` file:
```gradle theme={null}
dependencies {
// Salesmate Chat SDK (Firebase-enabled version – Coming soon)
implementation 'com.salesmate:salesmate-chat-android-sdk:COMING_SOON'
// Firebase Cloud Messaging (required for push notifications)
implementation 'com.google.firebase:firebase-messaging:20.2.+'
}
```
* Option 2: Install Skara Chat SDK without Push Messaging
```gradle theme={null}
dependencies {
implementation 'com.github.salesmate:salesmate-chat-android-sdk:1.0.5'
}
```
**Important:** If you choose this method you won’t be able to send push messages.
### **Jitpack** Salesmate Chat SDK is hosted on jitpack. You will need to add jitpack.io to your root build.gradle file.
```gradle theme={null}
allprojects {
repositories {
google()
mavenCentral()
maven { url 'https://jitpack.io' }
jcenter() // optional, only if needed for older dependencies
}
}
```
### **Permissions**- We include the [INTERNET](http://developer.android.com/reference/android/Manifest.permission.html#INTERNET) permission by default as we need it to make network requests:
```
```
* You will need to include the [READ\_EXTERNAL\_STORAGE](#login-a-user) permission if you have enabled image attachments:
``
### Initialize Salesmate Chat
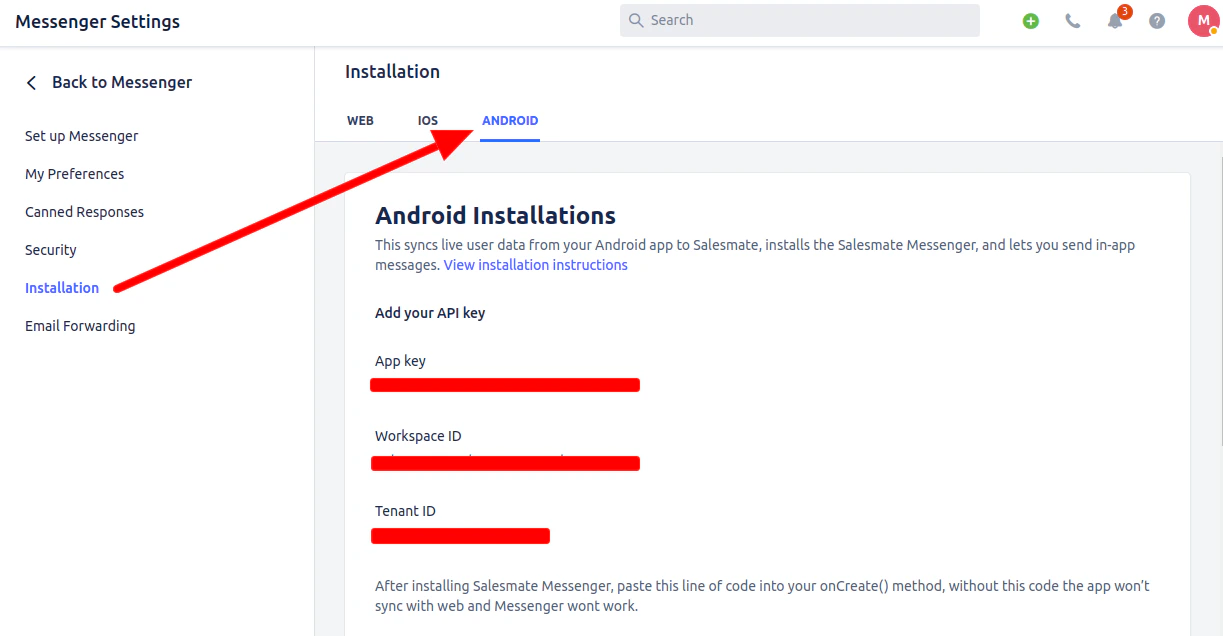
* First, you'll need to get your Skara Chat **App key, Workspace Id, and Tenant Id**. To find these, just select the 'Android Tab' option in your Skara CRM Messenger Settings Installation section.
 * Then, initialize Skara Chat SDK by calling the following in the `onCreate()` method of your application class:
```
val workspaceId = "your Workspace ID"
val appKey = "your app key"
val tenantId = "your Tenant ID"// Configuration
val salesmateChatSettings = SalesmateChatSettings(workspaceId,appKey,tenantId,BuildType.DEVELOPMENT) // Initialization Salesmate Chat SalesmateChatSDK.initialize(this, salesmateChatSettings)
```
**Note:** If you don't currently implement a custom application, you’ll need to create one. A custom application looks like this:
```kotlin theme={null}
import android.app.Application
import com.salesmate.chat.sdk.SalesmateChatSDK
import com.salesmate.chat.sdk.model.SalesmateChatSettings
import com.salesmate.chat.sdk.model.BuildType
class CustomApplication : Application() {
override fun onCreate() {
super.onCreate()
val workspaceId = "your Workspace ID"
val appKey = "your app key"
val tenantId = "your Tenant ID"
// Configuration
val salesmateChatSettings = SalesmateChatSettings(
workspaceId,
appKey,
tenantId,
BuildType.DEVELOPMENT // or PRODUCTION
)
// Initialize Salesmate Chat
SalesmateChatSDK.initialize(this, salesmateChatSettings)
}
}
```
* You’ll need to update your manifest to use your application:
` `
### Login a User
* You’ll now need to log in to users before you can communicate with them and track their activity in your app.
* **Login your users (to talk to them and see their activity)**
* Depending on your app type, you can log in to users. Here are the instructions :
* Here we will create a user with basic user detail in Skara CRM Messenger.
* If you have an app with logged-in (identified) users only (like Facebook, Instagram or Slack), follow these instructions:
* You’ll also need to log in to your user anywhere they sign in. Just call:
```kotlin theme={null}
// Prepare a user's detail object
val userDetail = UserDetails.create()
val email = "user's email address"
val firstName = "user's first name"
val lastName = "user's last name"
val userId = "user's user id" // Unique id recommended
userDetail.withEmail(email)
.withFirstName(firstName)
.withLastName(lastName)
SalesmateChatSDK.getInstance().login(userId, userDetail, object : LoginListener {
override fun onLogin() {
// Login successful
}
override fun onError(salesmateException: SalesmateException) {
// Login error
}
})
```
### How to Logout a User
* When users want to log out of your app, simply call logout like so:
```kotlin theme={null}
// This clears the SalesmateChat SDK's cache of your user's data
SalesmateChatSDK.getInstance().logout()
```
* Then, initialize Skara Chat SDK by calling the following in the `onCreate()` method of your application class:
```
val workspaceId = "your Workspace ID"
val appKey = "your app key"
val tenantId = "your Tenant ID"// Configuration
val salesmateChatSettings = SalesmateChatSettings(workspaceId,appKey,tenantId,BuildType.DEVELOPMENT) // Initialization Salesmate Chat SalesmateChatSDK.initialize(this, salesmateChatSettings)
```
**Note:** If you don't currently implement a custom application, you’ll need to create one. A custom application looks like this:
```kotlin theme={null}
import android.app.Application
import com.salesmate.chat.sdk.SalesmateChatSDK
import com.salesmate.chat.sdk.model.SalesmateChatSettings
import com.salesmate.chat.sdk.model.BuildType
class CustomApplication : Application() {
override fun onCreate() {
super.onCreate()
val workspaceId = "your Workspace ID"
val appKey = "your app key"
val tenantId = "your Tenant ID"
// Configuration
val salesmateChatSettings = SalesmateChatSettings(
workspaceId,
appKey,
tenantId,
BuildType.DEVELOPMENT // or PRODUCTION
)
// Initialize Salesmate Chat
SalesmateChatSDK.initialize(this, salesmateChatSettings)
}
}
```
* You’ll need to update your manifest to use your application:
` `
### Login a User
* You’ll now need to log in to users before you can communicate with them and track their activity in your app.
* **Login your users (to talk to them and see their activity)**
* Depending on your app type, you can log in to users. Here are the instructions :
* Here we will create a user with basic user detail in Skara CRM Messenger.
* If you have an app with logged-in (identified) users only (like Facebook, Instagram or Slack), follow these instructions:
* You’ll also need to log in to your user anywhere they sign in. Just call:
```kotlin theme={null}
// Prepare a user's detail object
val userDetail = UserDetails.create()
val email = "user's email address"
val firstName = "user's first name"
val lastName = "user's last name"
val userId = "user's user id" // Unique id recommended
userDetail.withEmail(email)
.withFirstName(firstName)
.withLastName(lastName)
SalesmateChatSDK.getInstance().login(userId, userDetail, object : LoginListener {
override fun onLogin() {
// Login successful
}
override fun onError(salesmateException: SalesmateException) {
// Login error
}
})
```
### How to Logout a User
* When users want to log out of your app, simply call logout like so:
```kotlin theme={null}
// This clears the SalesmateChat SDK's cache of your user's data
SalesmateChatSDK.getInstance().logout()
```