> ## Documentation Index
> Fetch the complete documentation index at: https://support.getskara.ai/llms.txt
> Use this file to discover all available pages before exploring further.
# Customize the Module Create Forms
If you need a field in Skara that does not exist by default, it can always be added as a custom field. Using form layouts and custom fields you can capture all required info and reposition fields in the desired order. This feature is available for **Contact, Company and Ticket Module**.
**Topics Covered:**
* [How to Customize the Module Create Forms](#how-to-customize-the-create-form-in-modules)
* [How to Customize Module Quick Create Forms](#how-to-customize-module-quick-create-forms)
### How to Customize the Create Form in Modules
To customize the Module Create Forms,
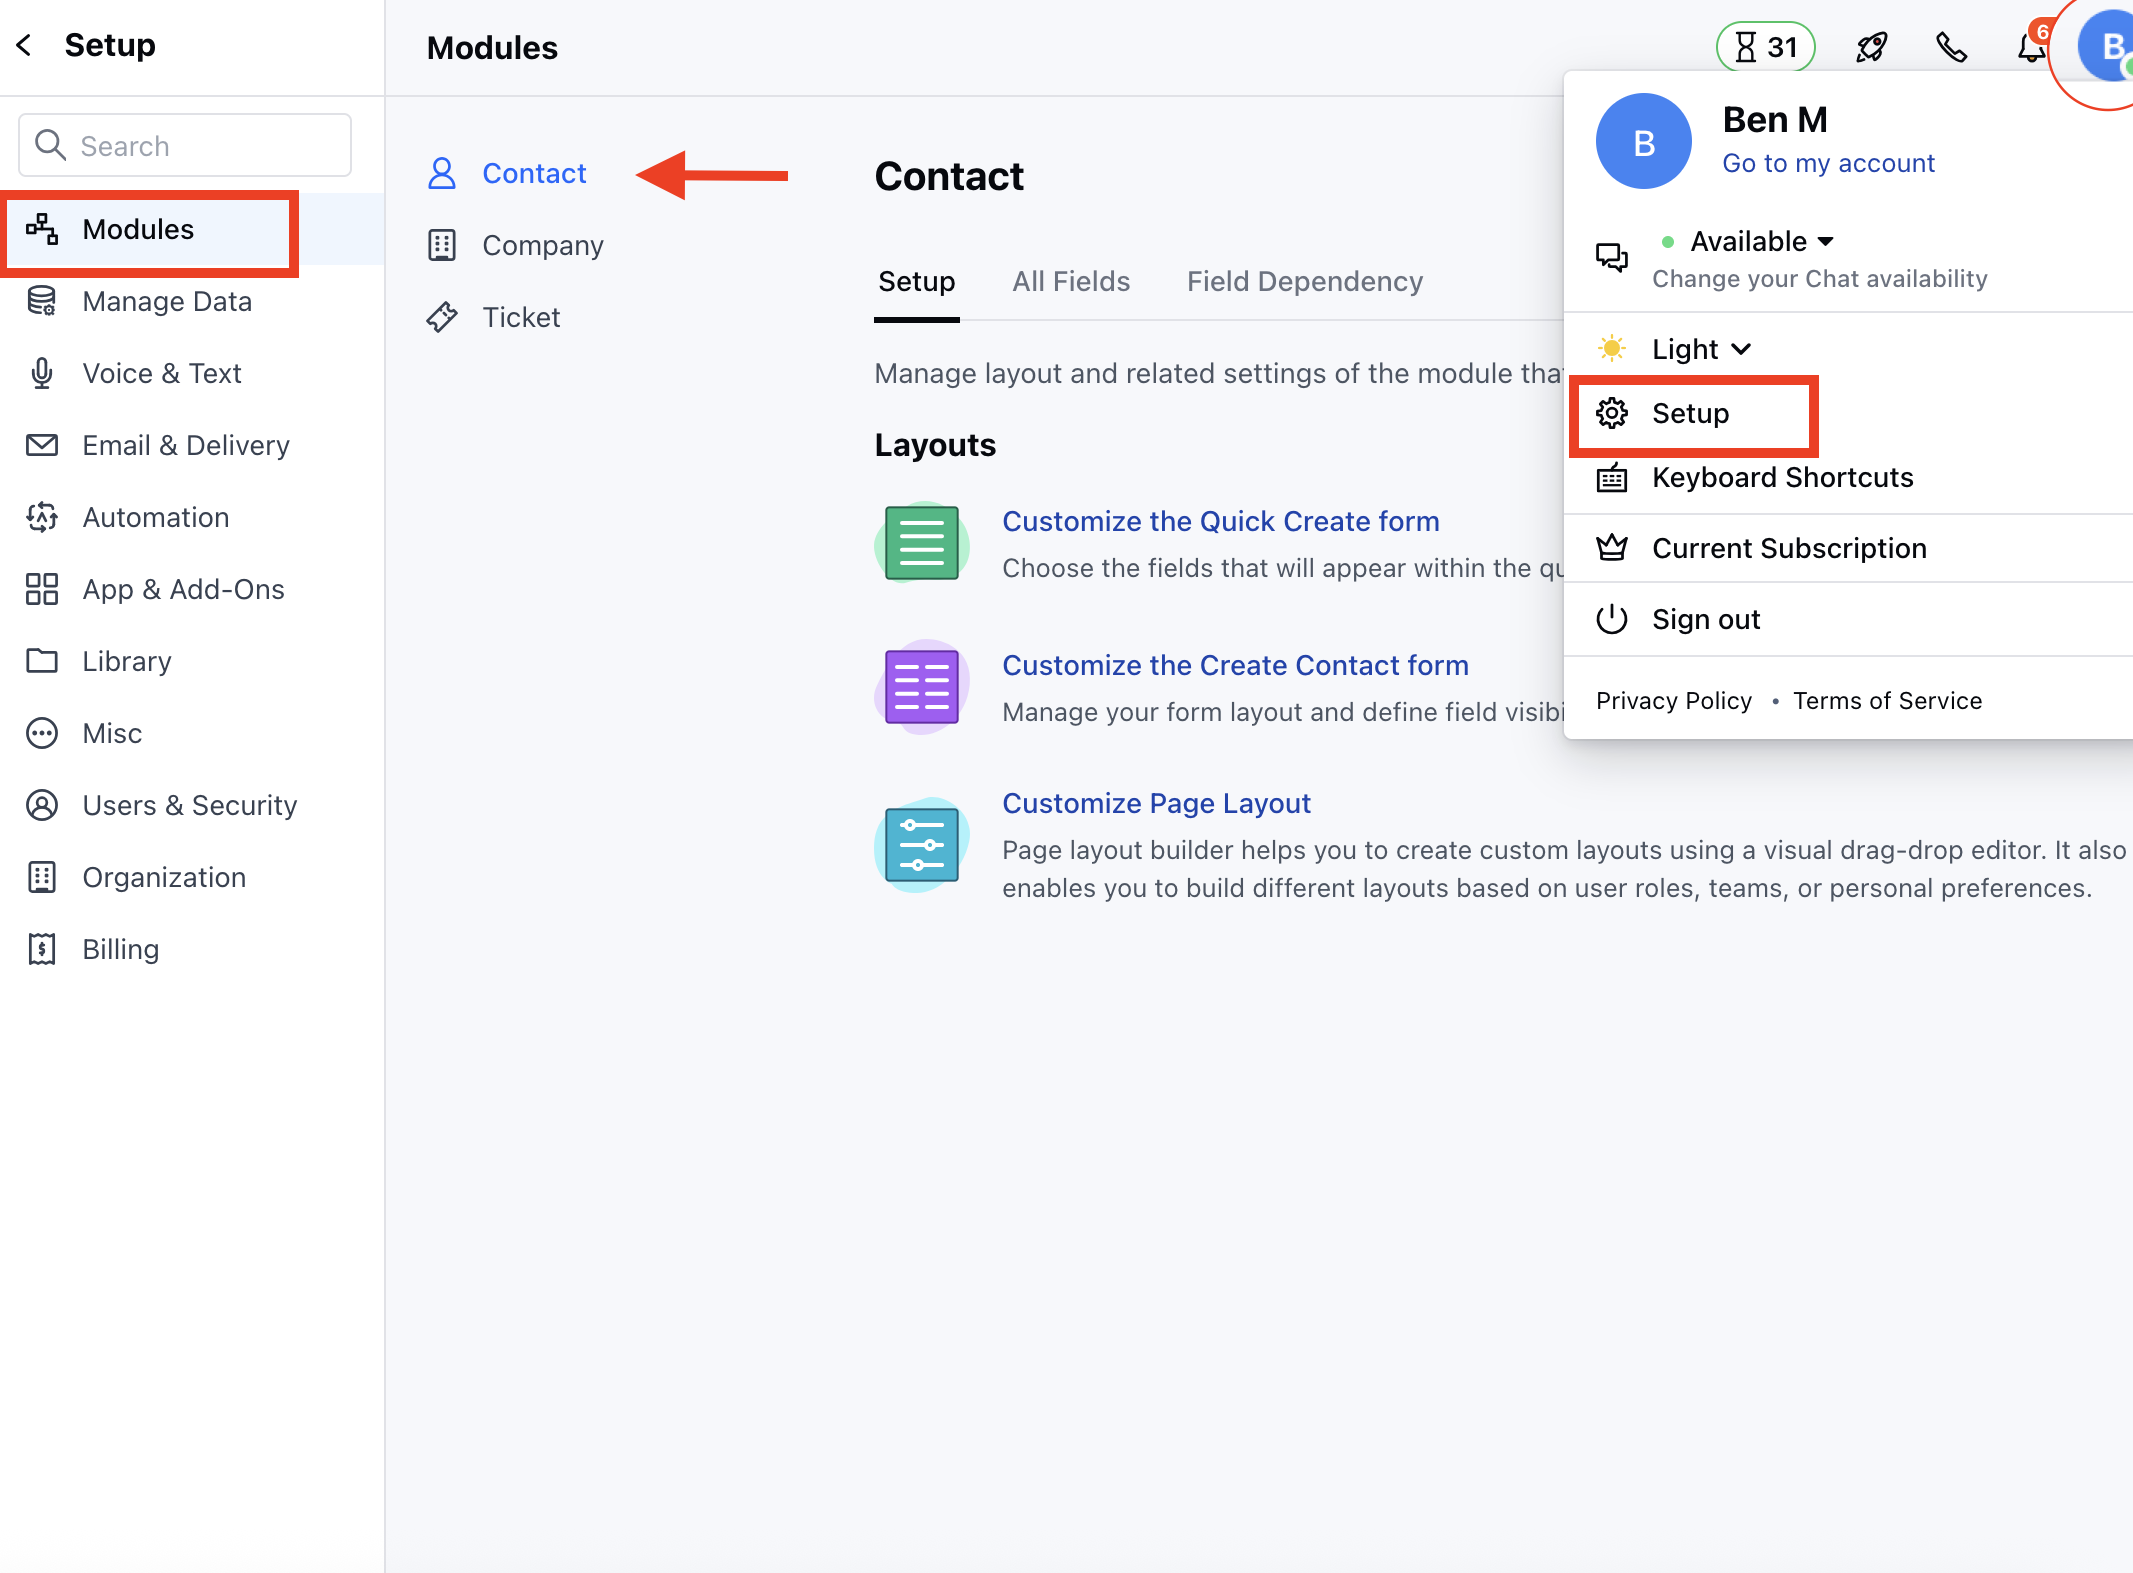
* Navigate to the **Profile Icon** on the top right corner
* Click on the **Set Up**
* Head Over to the **Modules** Category
* Select the Module(**Contact, Company and Ticket Module)**
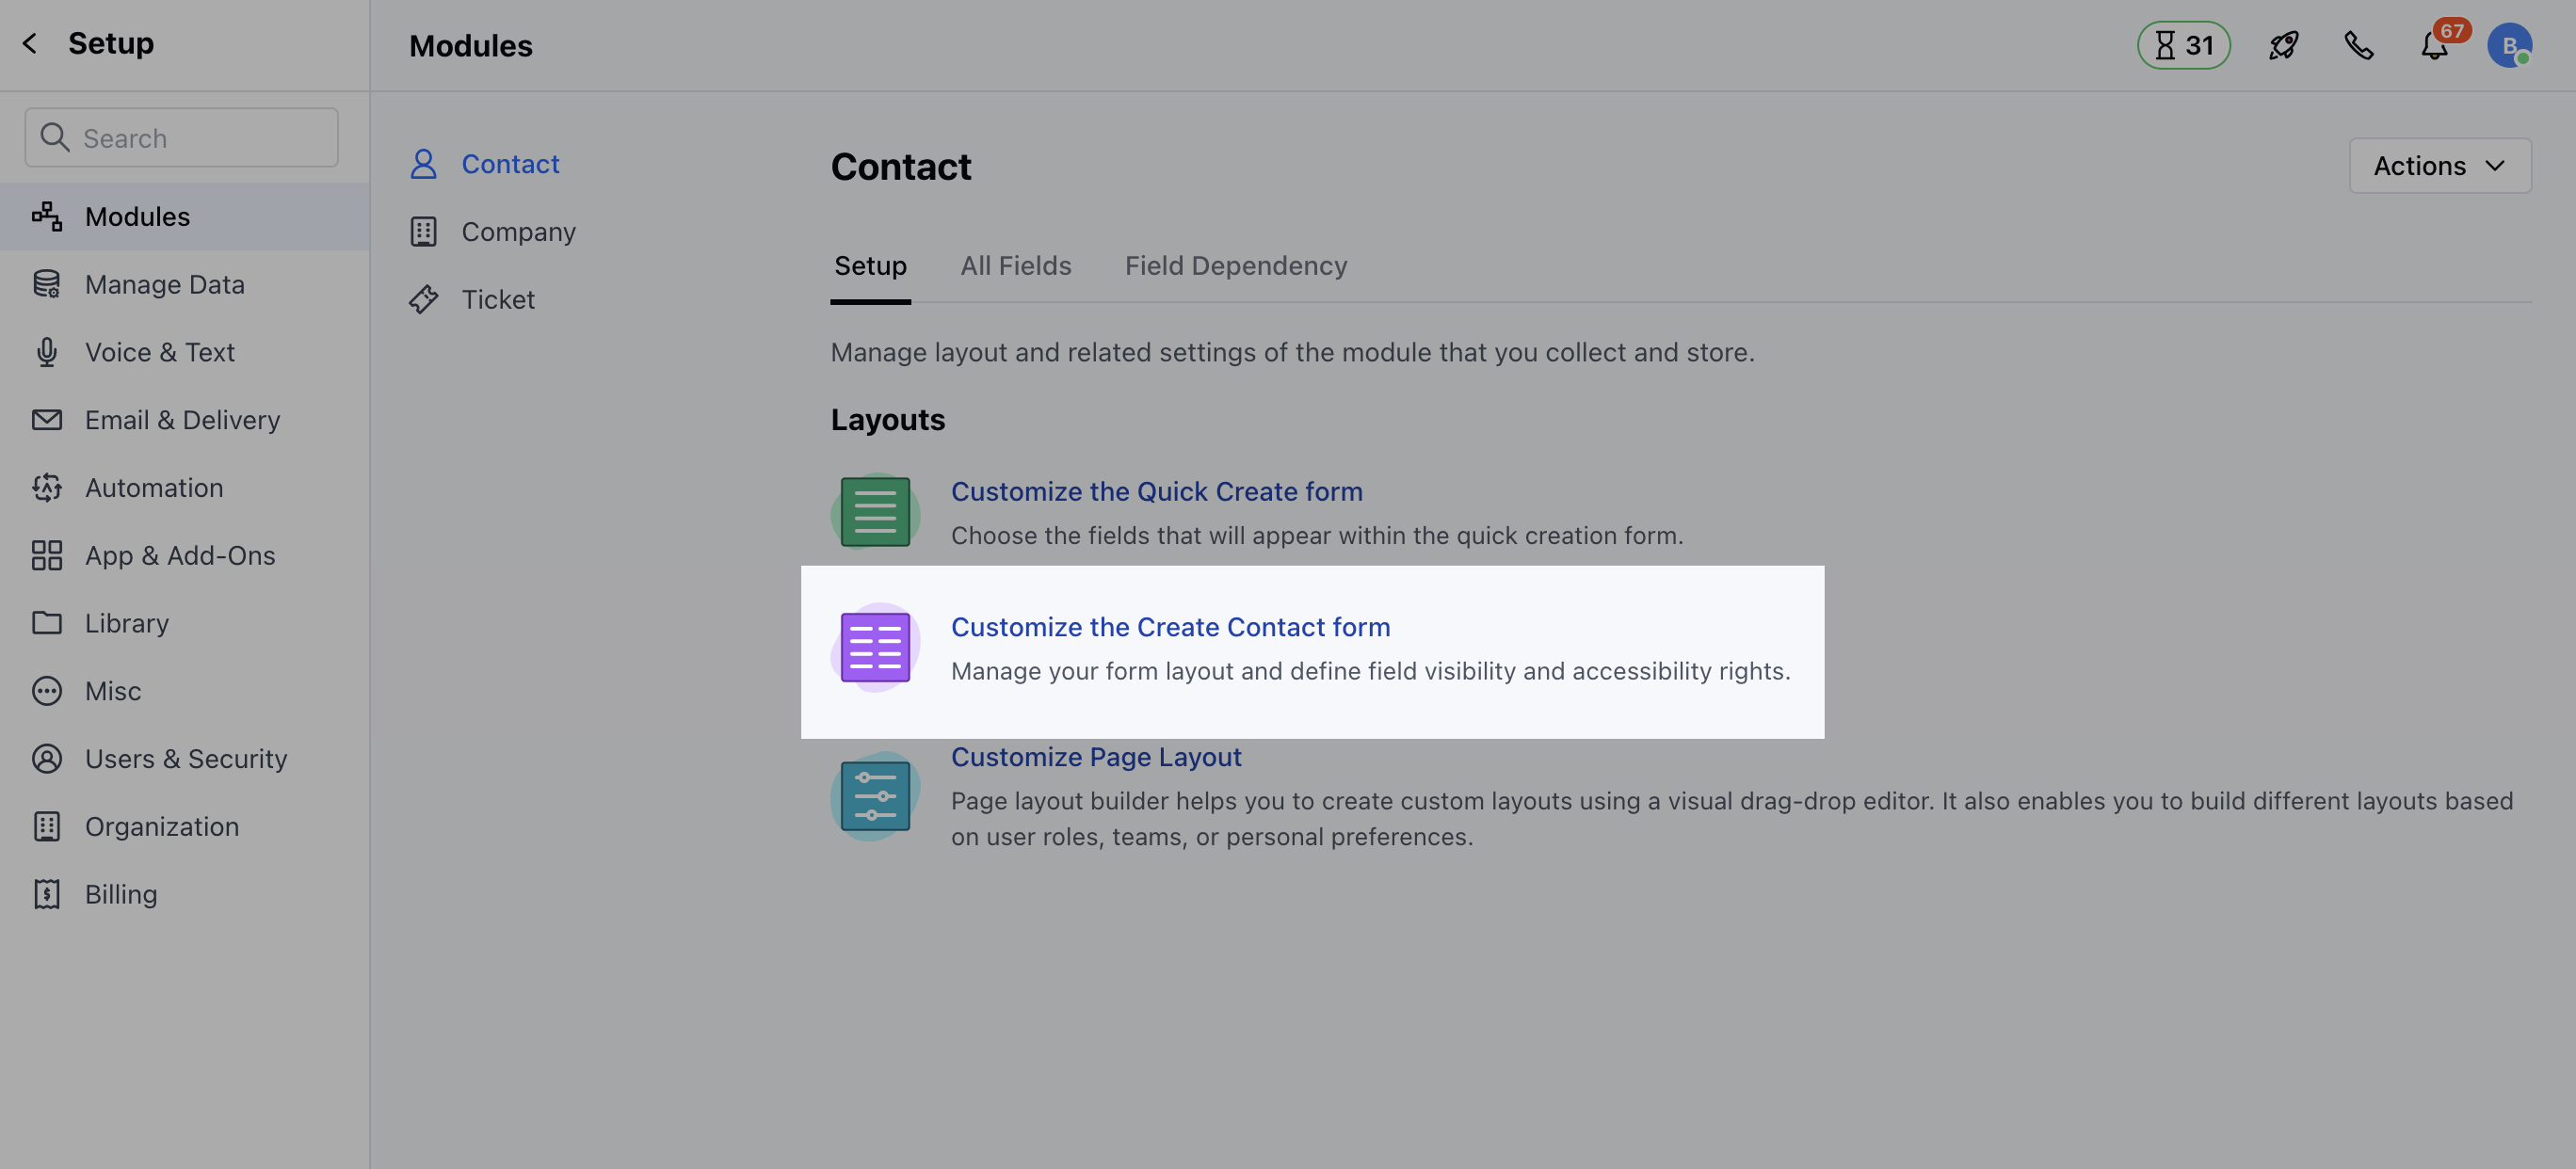
* Click on **Customize the Create Module Form**
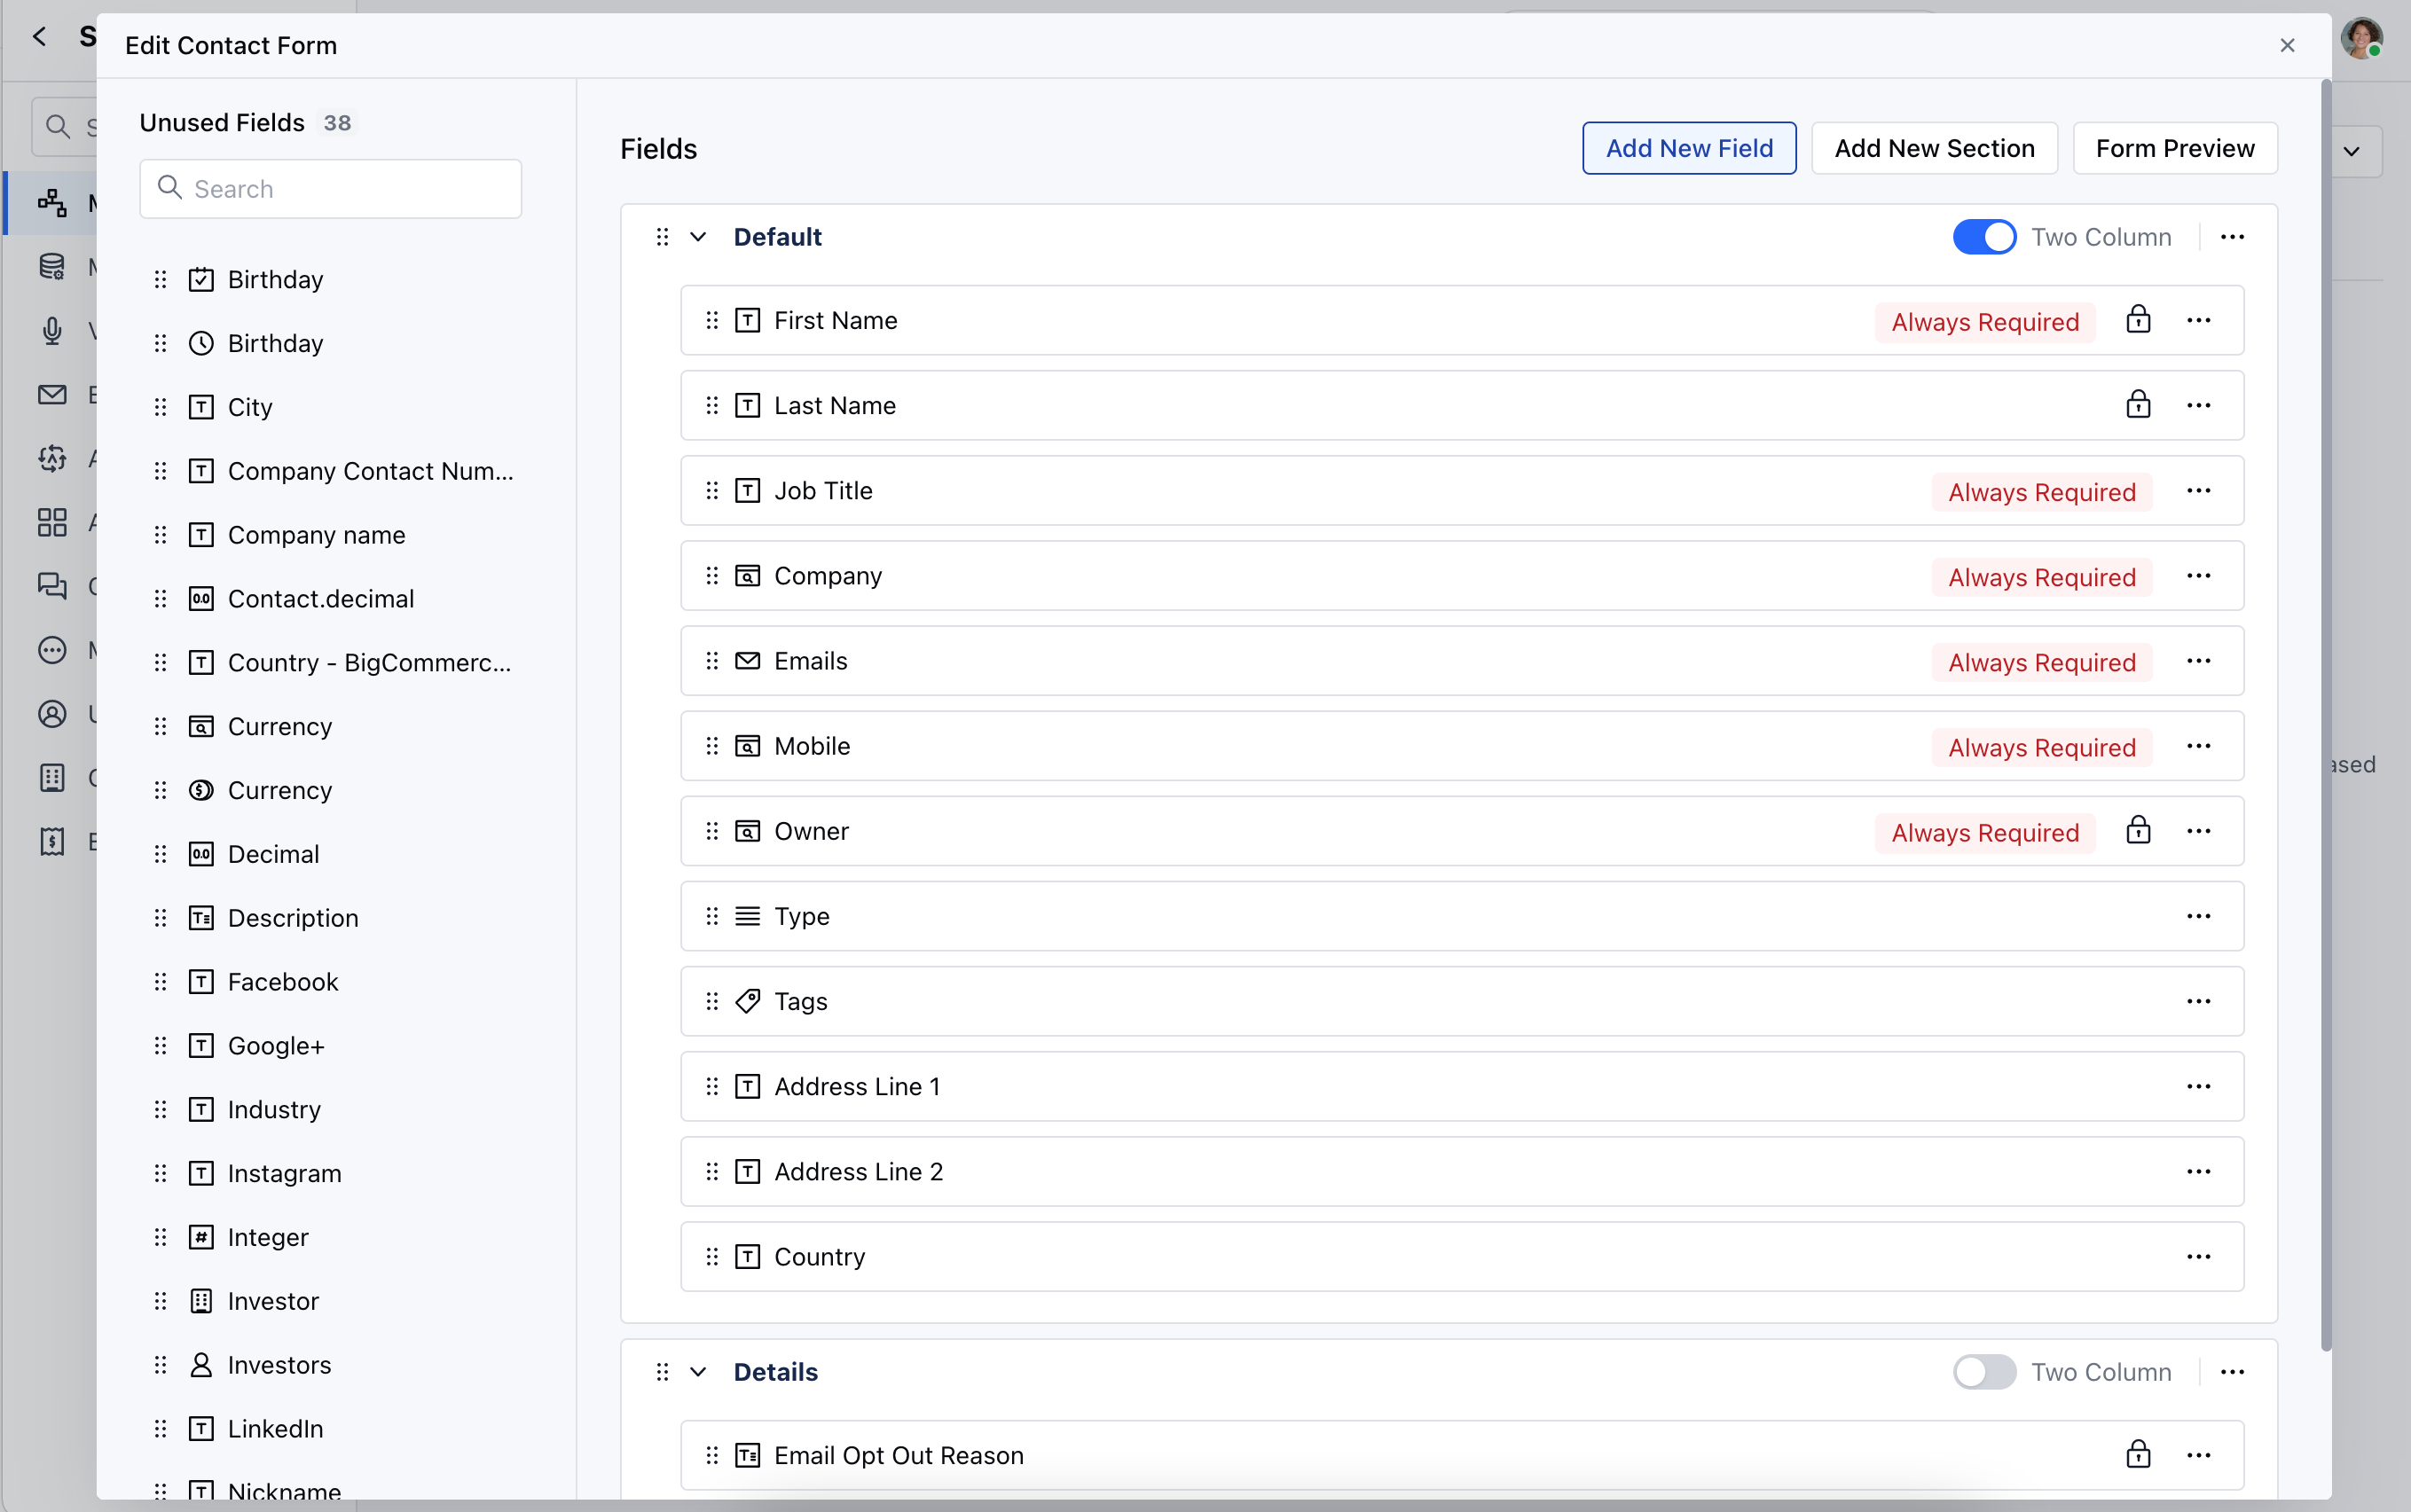
* The Edit Module Form will be presented, enabling you to make additional modifications
* The screen is divided into two sections: on the left, you'll find Unused Fields, while the right section displays the current fields present in the form
* You can customize the layout of the creation form by
* [Managing sections](https://support.salesmate.io/hc/en-us/articles/29288603912857)
* [Managing Fields](https://support.salesmate.io/hc/en-us/articles/360041831032-How-to-Create-Custom-fields)
* You can effortlessly drag and drop fields into the "Unused" section if they're not needed during record creation, and vice versa, move fields from the "Unused" section to the active section on the right.
* Additionally, you can rearrange the fields in your preferred order by simple drag and drop
* Once you've configured your preferences, you can view the appearance with the Form Preview option.
### How to Customize Module Quick Create Forms
To customize the Module Quick Create Forms,
* Navigate to the **Profile Icon** on the top right corner
* Click on Set Up
* Head Over to the Modules Category
* Select the Module **(Contact, Company and Ticket Modules)**
* *Click on* **Customize the Quick Create Module Form** under Layout
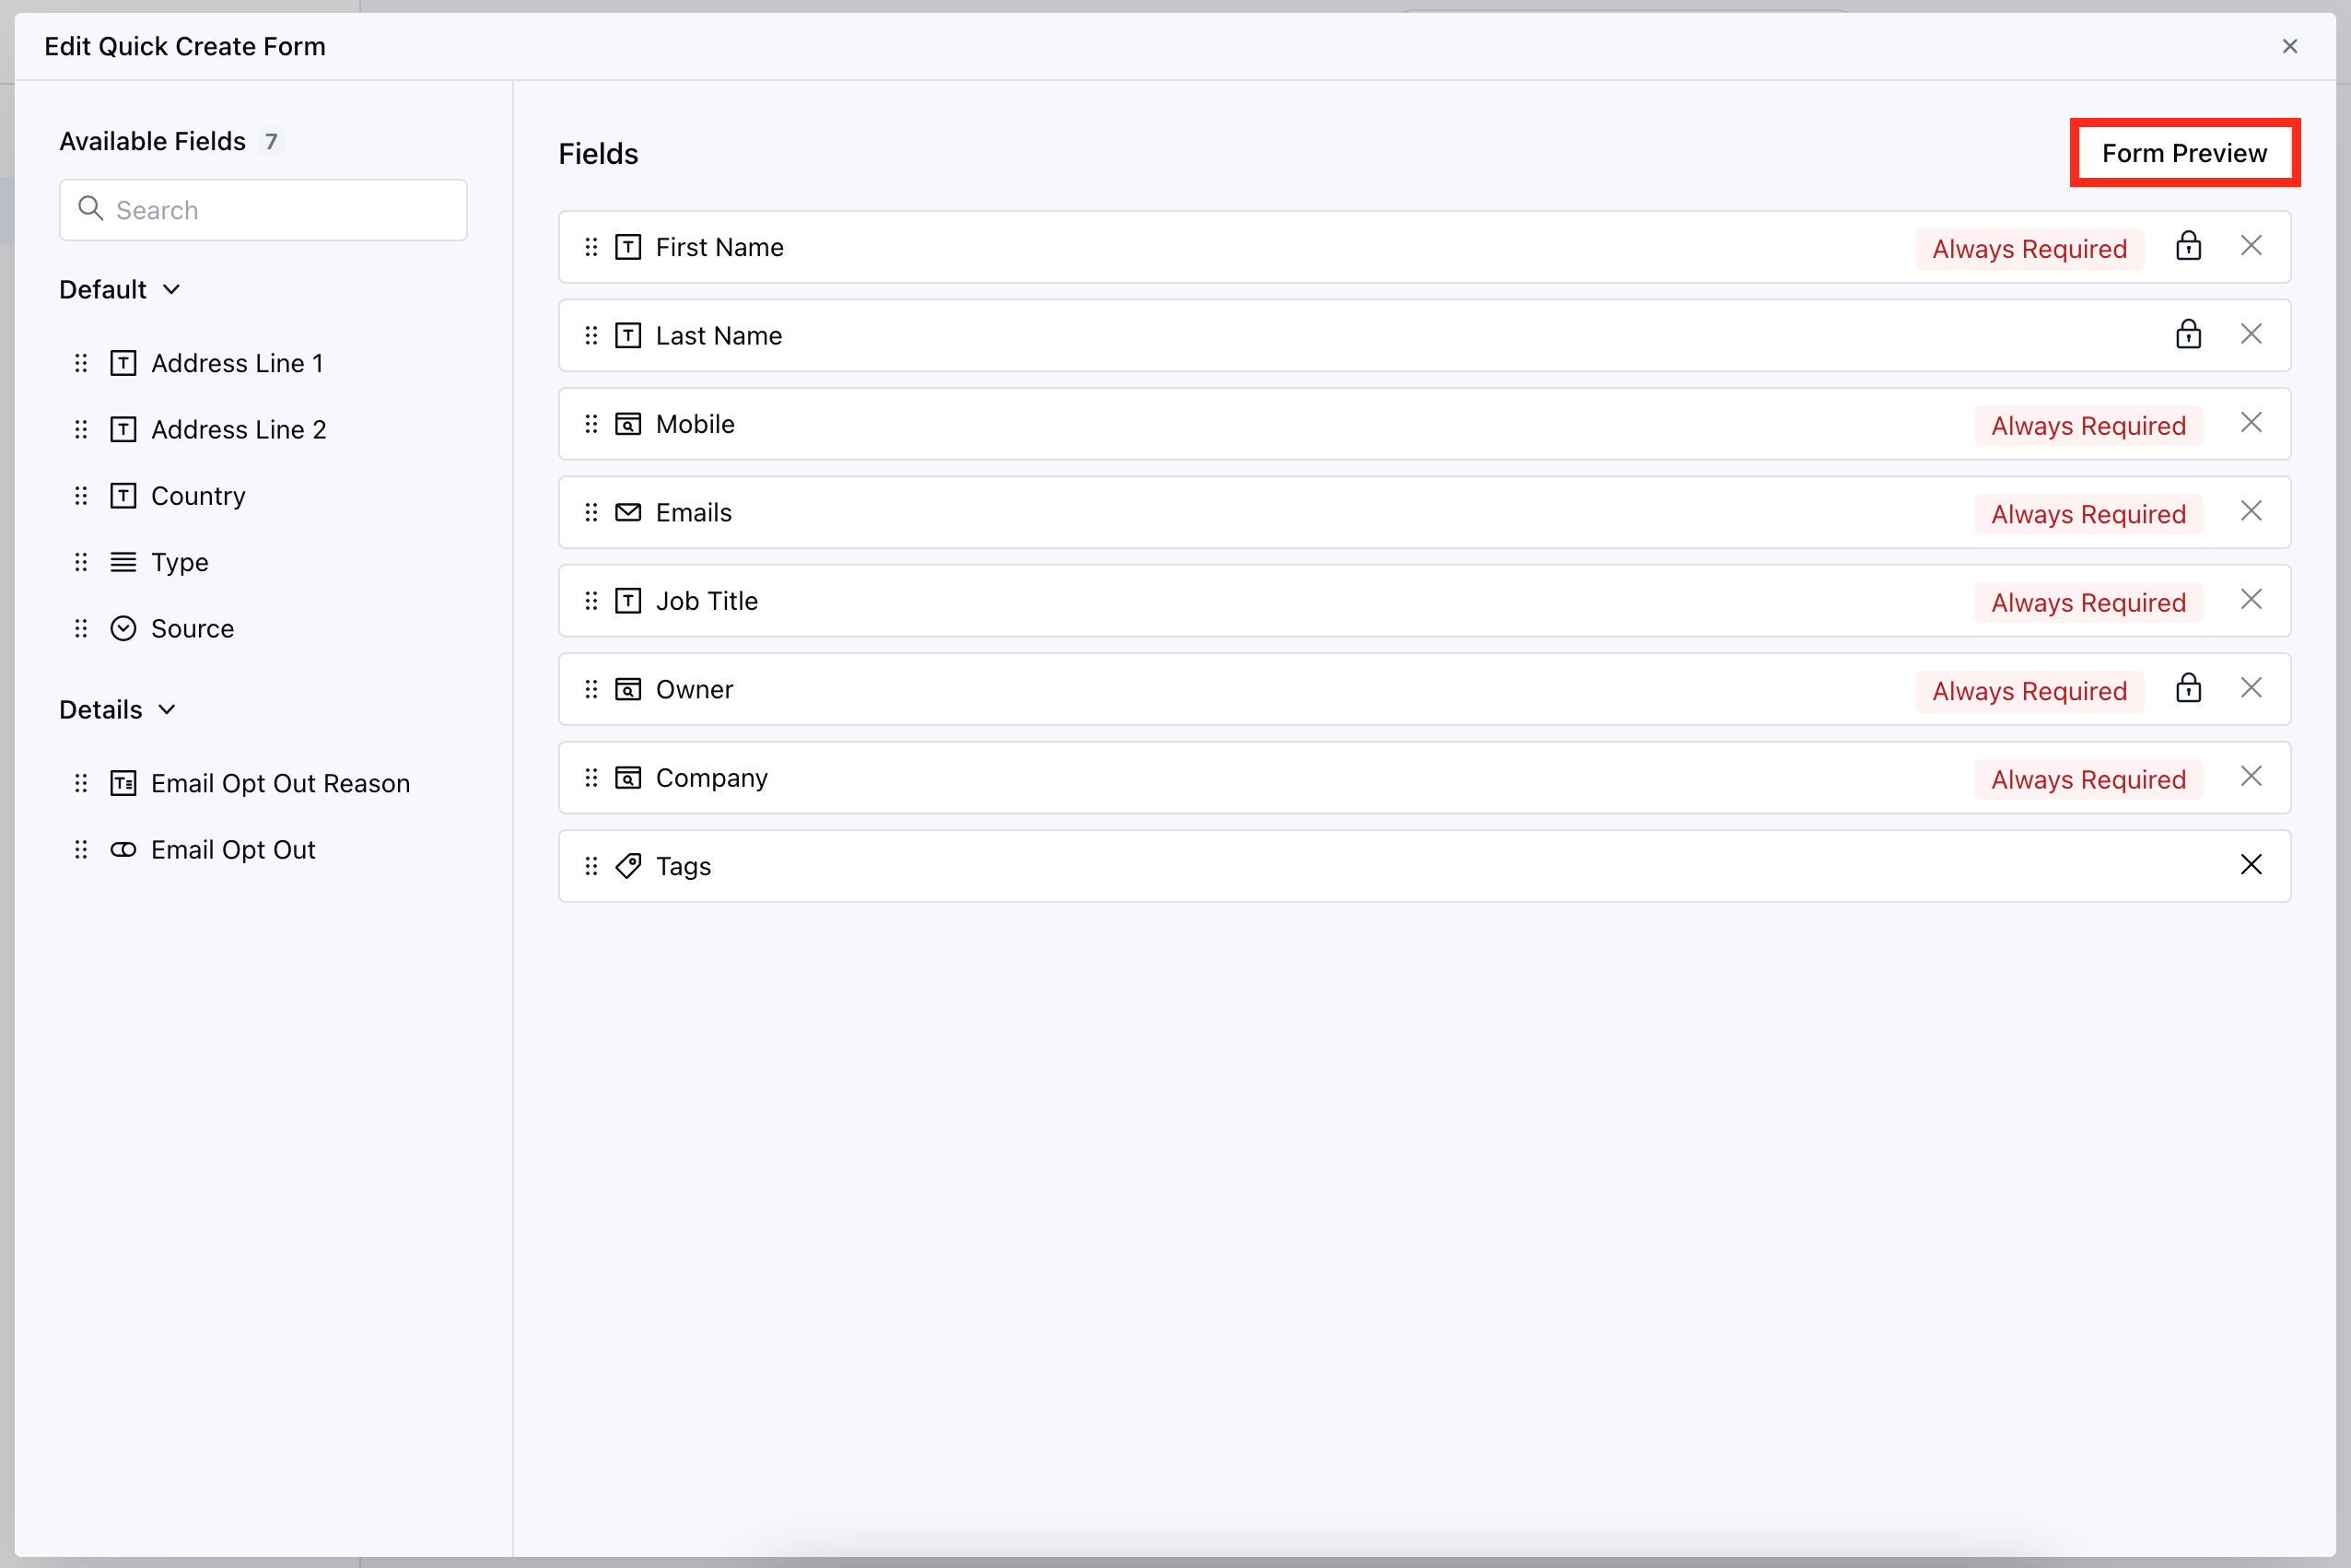
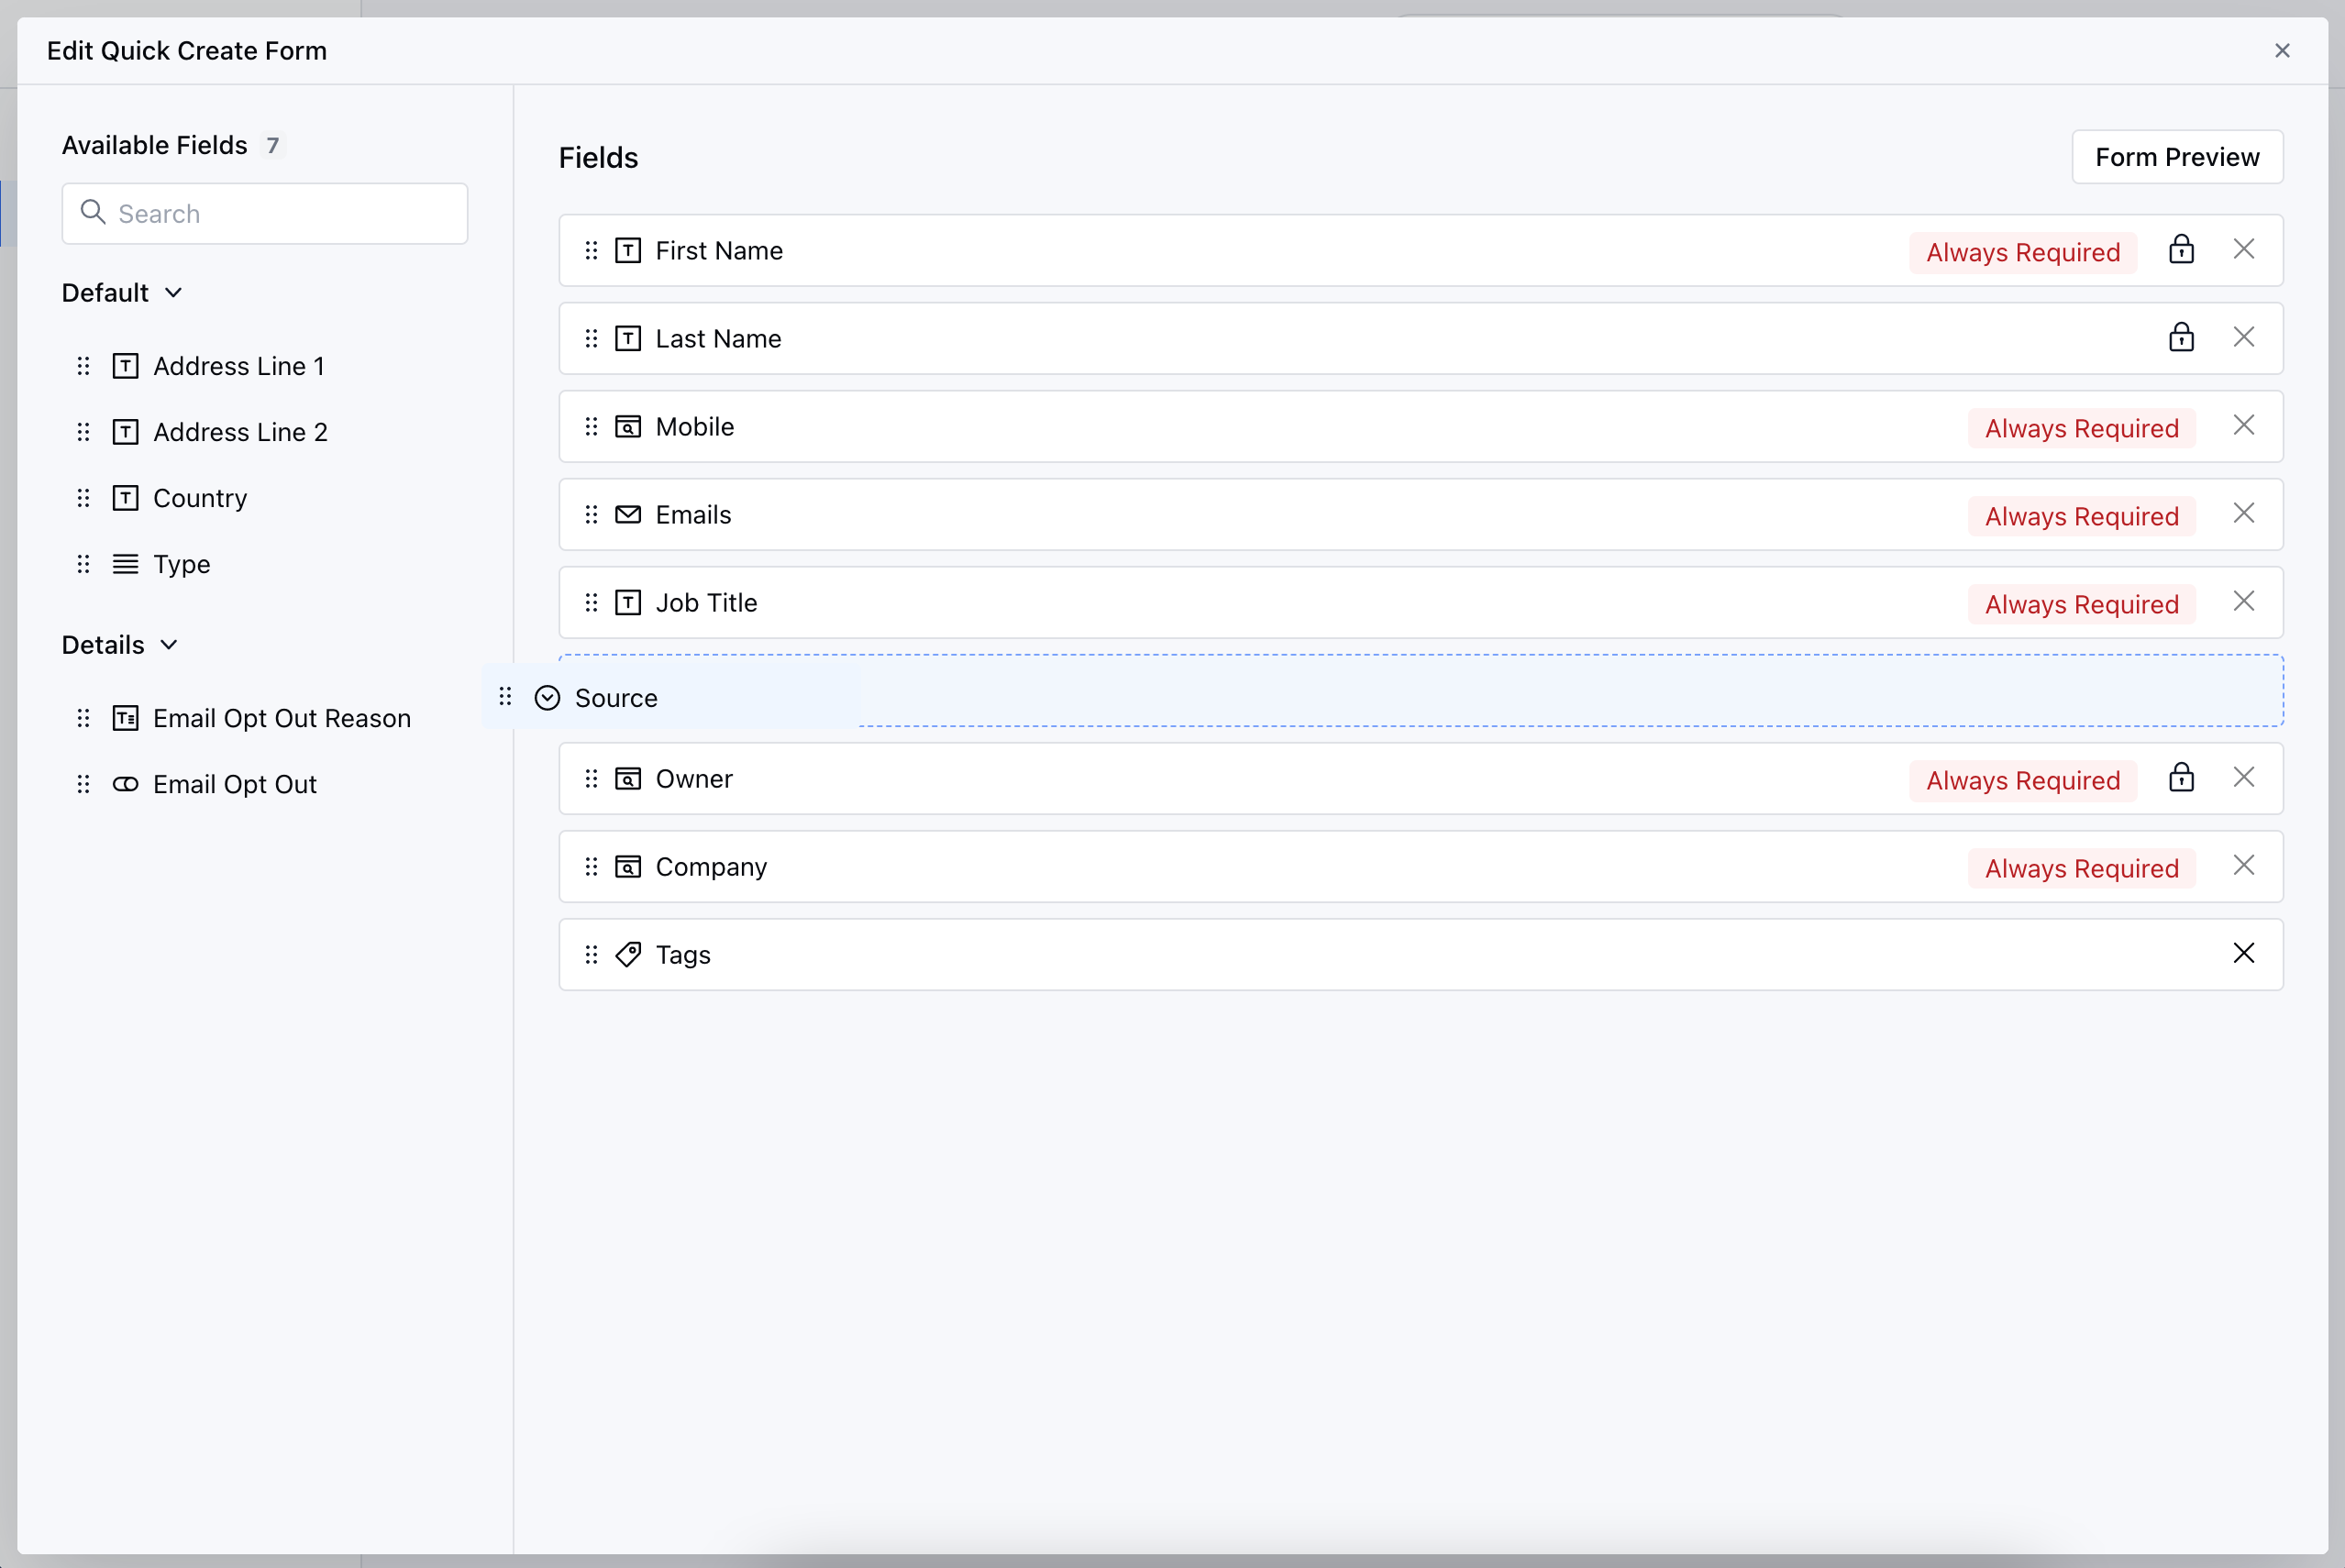
* The **Edit Quick Module Form** will be presented to customize the form's fields
* Here,**"Available Fields"** displays a list of fields that can be included in the Quick Create Form, while **"Fields"** shows all fields currently present in the form.
* You can customize the layout by selecting and arranging fields
* Simply drag and drop fields from the Available section to add them to the form, and vice versa to remove them.
Click the **Form Preview** to displays a preview of the form design.
 * Click on **Customize the Create Module Form**
 * The Edit Module Form will be presented, enabling you to make additional modifications
* The screen is divided into two sections: on the left, you'll find Unused Fields, while the right section displays the current fields present in the form
* The Edit Module Form will be presented, enabling you to make additional modifications
* The screen is divided into two sections: on the left, you'll find Unused Fields, while the right section displays the current fields present in the form
 * You can customize the layout of the creation form by
* [Managing sections](https://support.salesmate.io/hc/en-us/articles/29288603912857)
* [Managing Fields](https://support.salesmate.io/hc/en-us/articles/360041831032-How-to-Create-Custom-fields)
* You can effortlessly drag and drop fields into the "Unused" section if they're not needed during record creation, and vice versa, move fields from the "Unused" section to the active section on the right.
* You can customize the layout of the creation form by
* [Managing sections](https://support.salesmate.io/hc/en-us/articles/29288603912857)
* [Managing Fields](https://support.salesmate.io/hc/en-us/articles/360041831032-How-to-Create-Custom-fields)
* You can effortlessly drag and drop fields into the "Unused" section if they're not needed during record creation, and vice versa, move fields from the "Unused" section to the active section on the right.
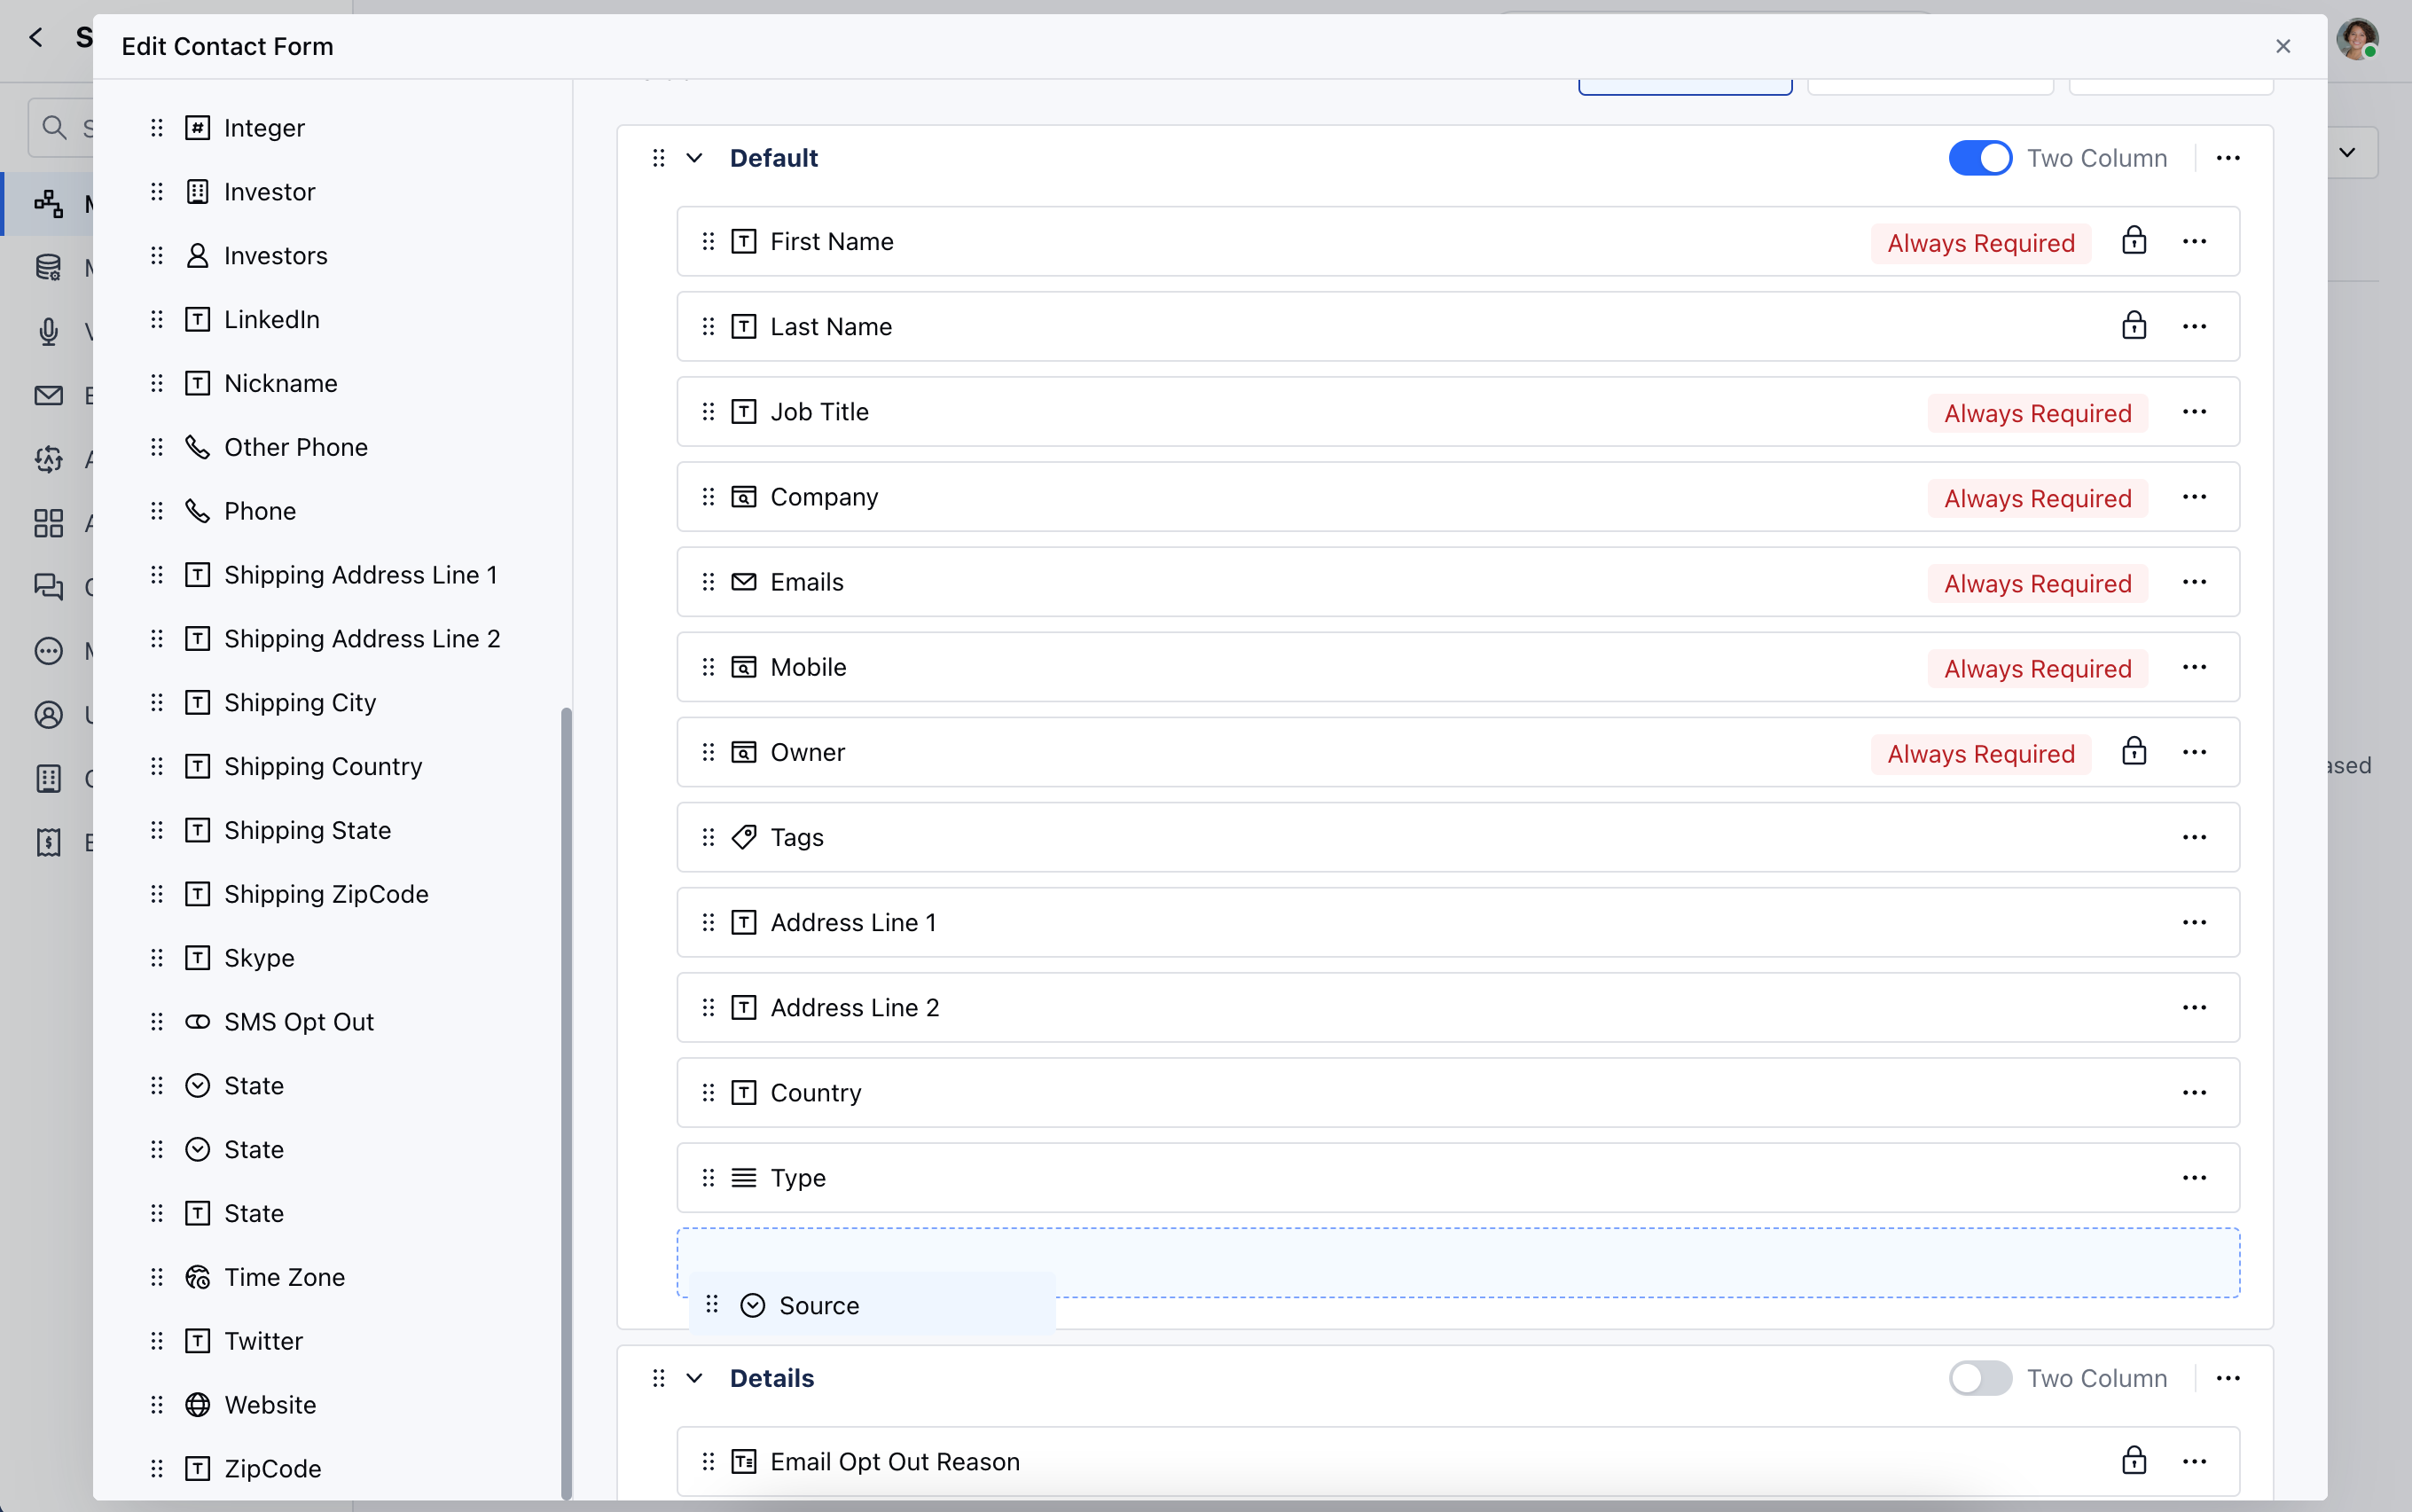 * Additionally, you can rearrange the fields in your preferred order by simple drag and drop
* Once you've configured your preferences, you can view the appearance with the Form Preview option.
* Additionally, you can rearrange the fields in your preferred order by simple drag and drop
* Once you've configured your preferences, you can view the appearance with the Form Preview option.
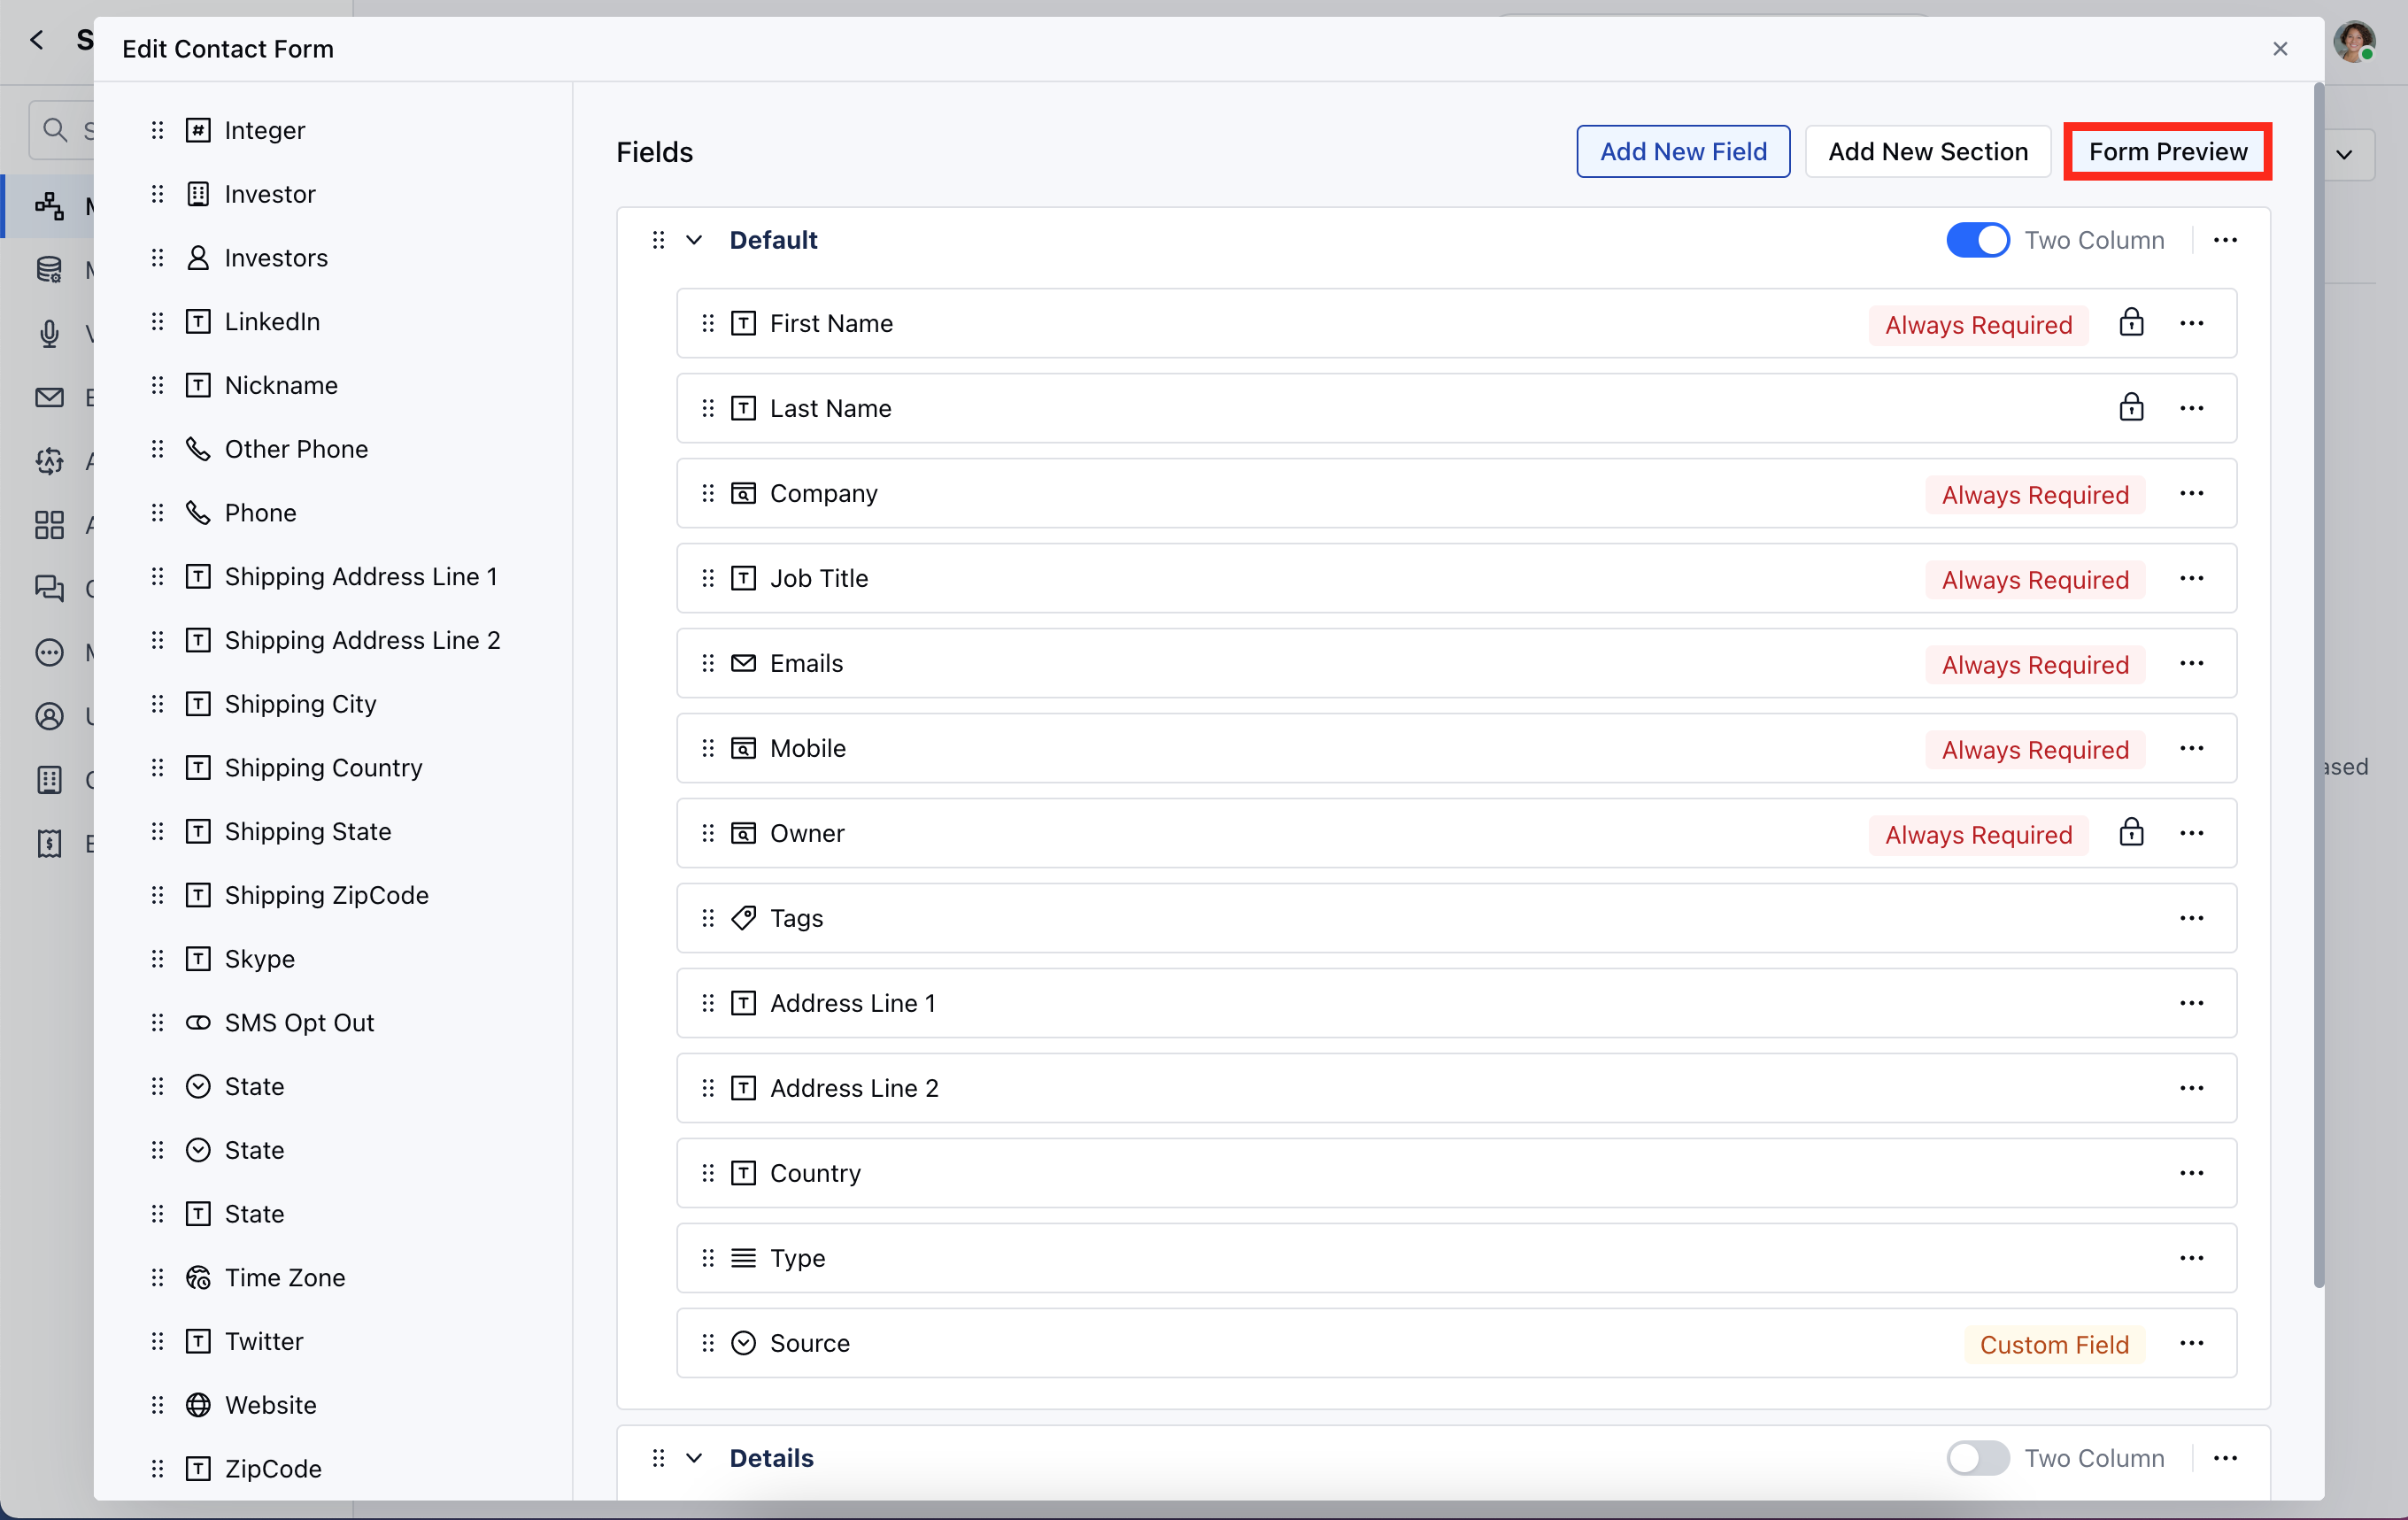 ### How to Customize Module Quick Create Forms
To customize the Module Quick Create Forms,
* Navigate to the **Profile Icon** on the top right corner
* Click on Set Up
* Head Over to the Modules Category
* Select the Module **(Contact, Company and Ticket Modules)**
### How to Customize Module Quick Create Forms
To customize the Module Quick Create Forms,
* Navigate to the **Profile Icon** on the top right corner
* Click on Set Up
* Head Over to the Modules Category
* Select the Module **(Contact, Company and Ticket Modules)**
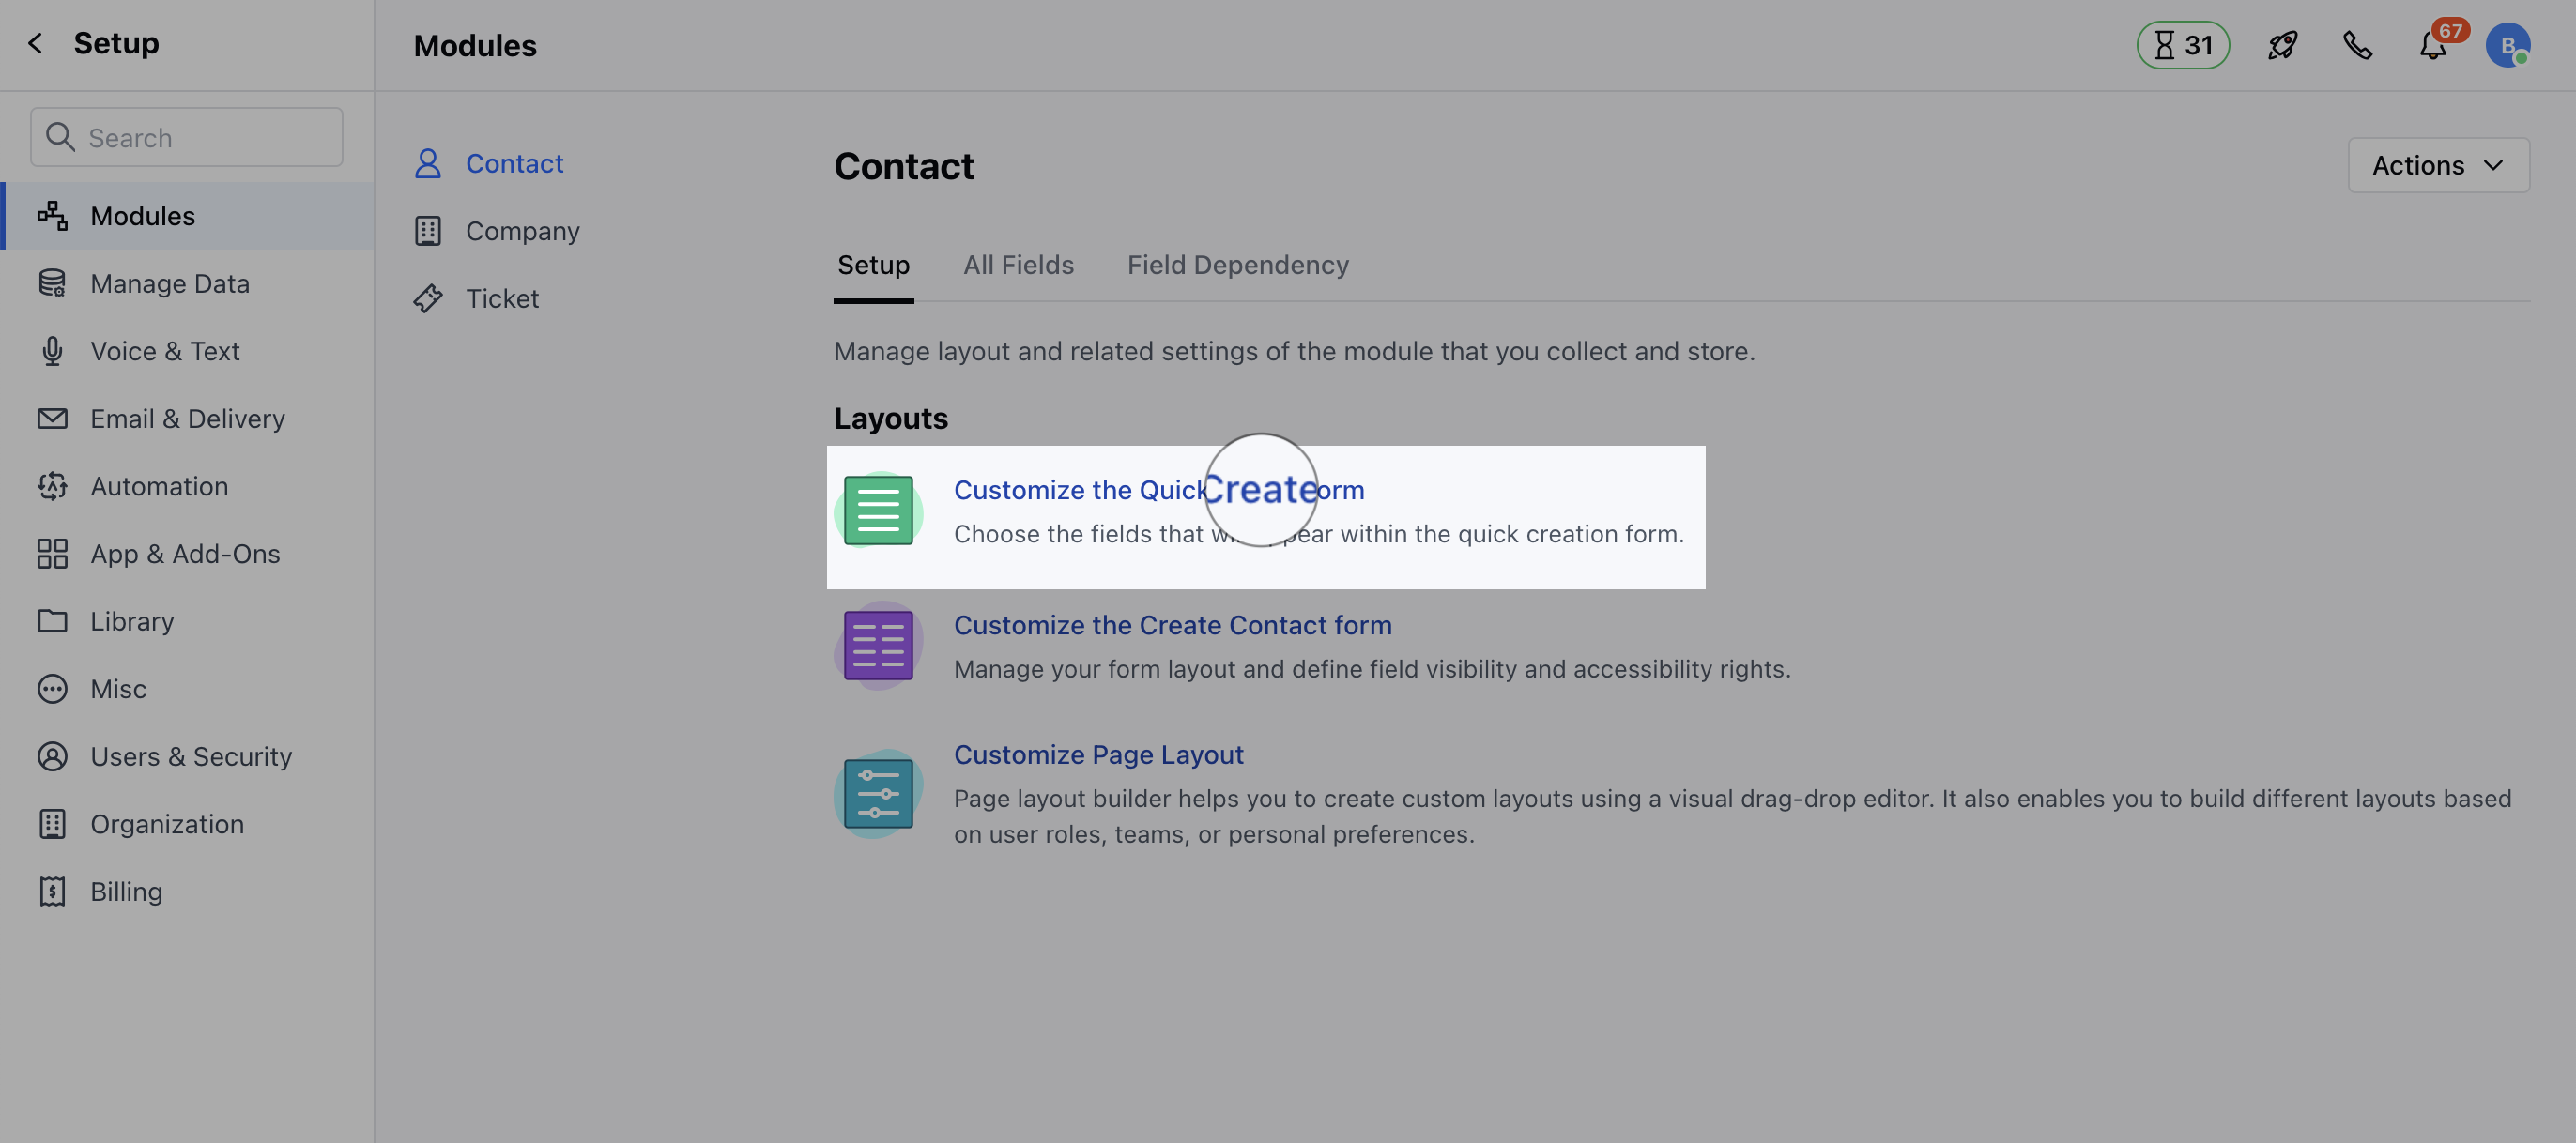 * The **Edit Quick Module Form** will be presented to customize the form's fields
* Here,**"Available Fields"** displays a list of fields that can be included in the Quick Create Form, while **"Fields"** shows all fields currently present in the form.
* The **Edit Quick Module Form** will be presented to customize the form's fields
* Here,**"Available Fields"** displays a list of fields that can be included in the Quick Create Form, while **"Fields"** shows all fields currently present in the form.
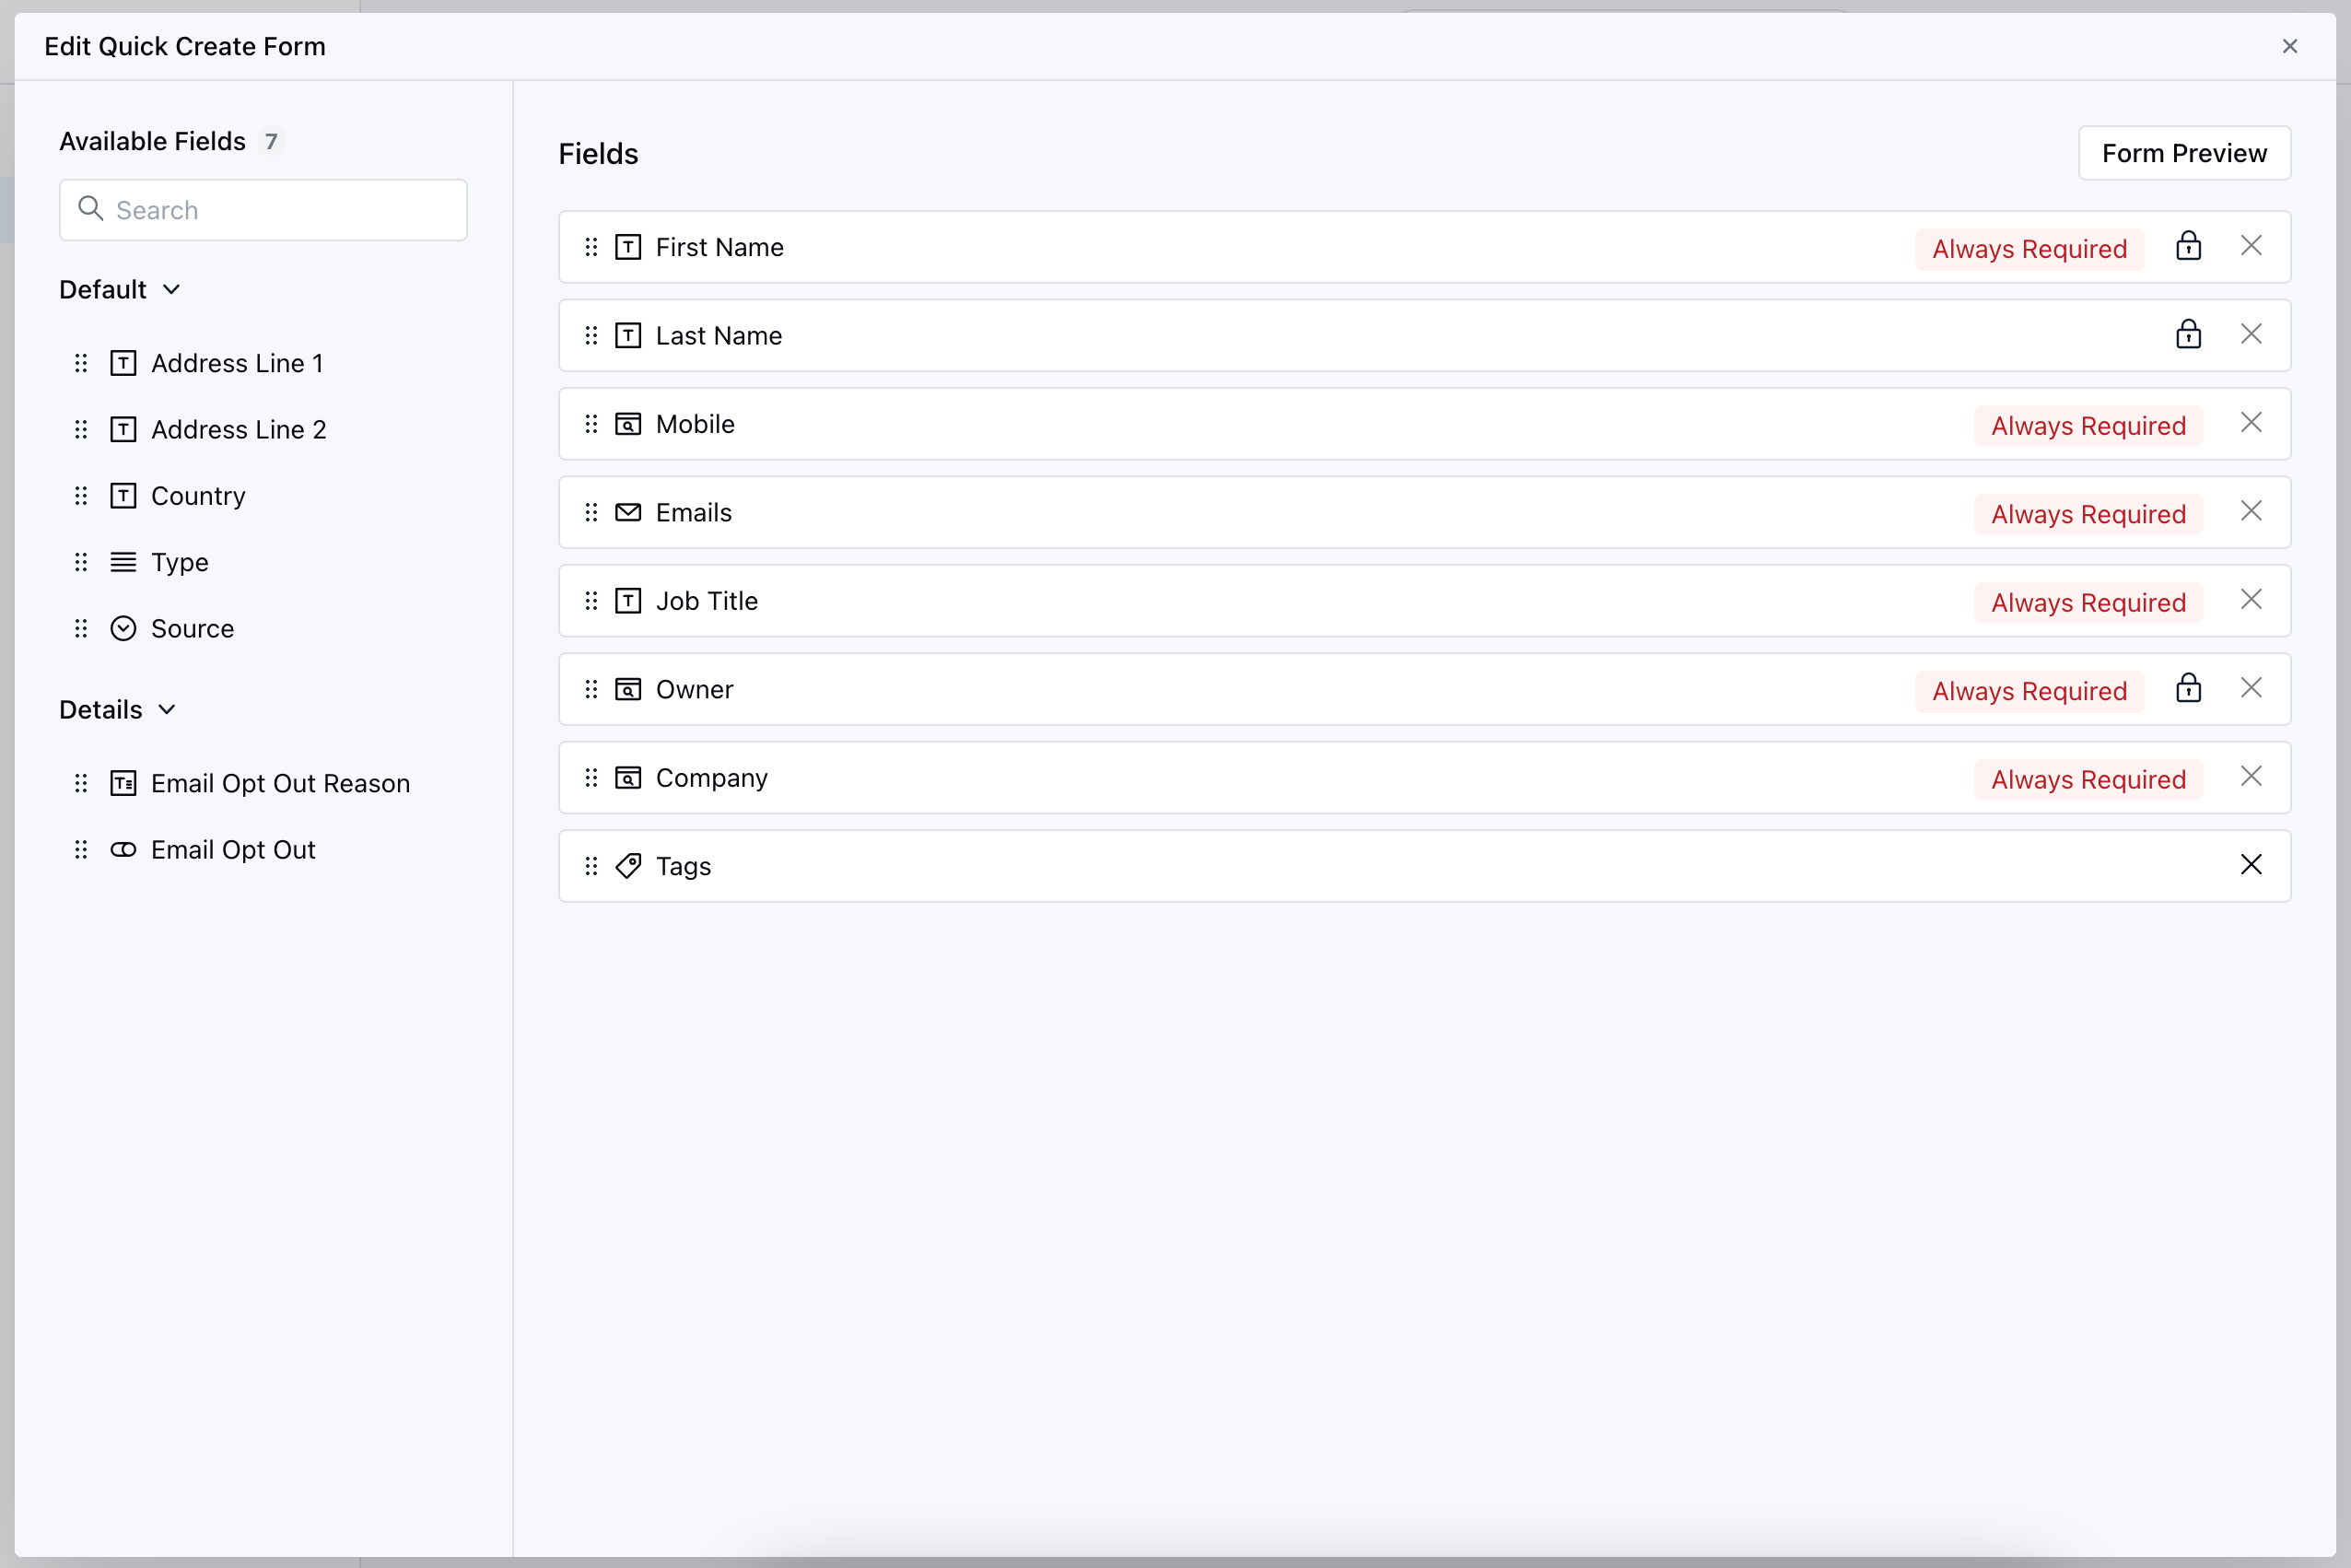 * You can customize the layout by selecting and arranging fields
* Simply drag and drop fields from the Available section to add them to the form, and vice versa to remove them.
* You can customize the layout by selecting and arranging fields
* Simply drag and drop fields from the Available section to add them to the form, and vice versa to remove them.
 Click the **Form Preview** to displays a preview of the form design.