> ## Documentation Index
> Fetch the complete documentation index at: https://support.getskara.ai/llms.txt
> Use this file to discover all available pages before exploring further.
# Email Received (Trigger)
Get started with the Email Received trigger in Salesmate CRM to kick off a Smart Flow whenever an email lands in your designated inbox. It’s a simple way to automate tasks like following up with customers, creating records, or pulling key details from emails.
**Note:** You’ll need permission to manage Smart Flows to set up this trigger.Topics Covered:
* [Steps to Set Up an Email Received Trigger](#steps-to-set-up-an-email-received-trigger)
* [Set Up the Trigger](#set-up-the-trigger)
* [Create Parsing Rules](#create-parsing-rules)
* [Data Available in Your Flow](#data-available-in-your-flow)
* [Practical Use Cases](#practical-use-cases)
### Steps to Set Up an Email Received Trigger
Navigate to the left S \*\*idebar.
* \*\* Click **Smart Flows**, then choose **Create Flow**.
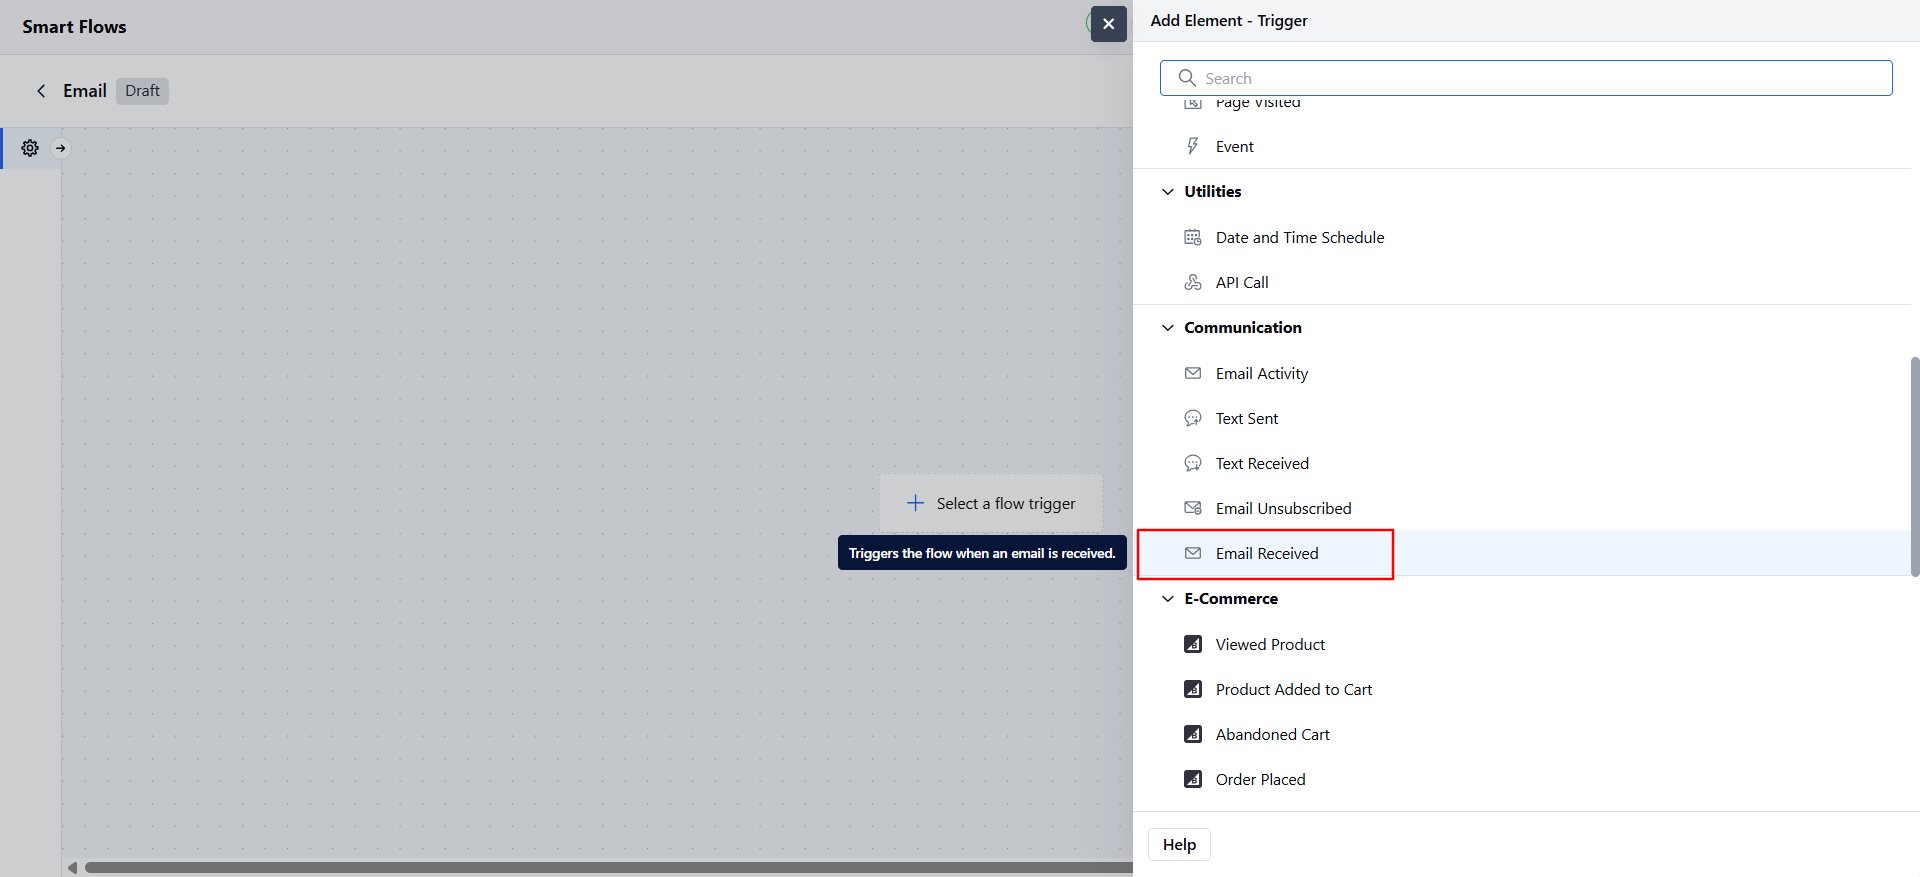 Add the **Email Received** trigger to start your flow when an email arrives.
### Set Up the Trigger
Here’s what you need to configure:**Email Address**:
You’ll get a custom email address like SF-ER-\[yourtext]@yourdomain.salesmate.io.The “SF-ER” part is fixed, but you can pick a custom word (3-20 characters, using letters, numbers, hyphens, or dots).
* **Name**: Give the trigger a name that matches its purpose (e.g., “Order Emails”).
* **Description**: Add a short note to explain what the trigger does.
Add the **Email Received** trigger to start your flow when an email arrives.
### Set Up the Trigger
Here’s what you need to configure:**Email Address**:
You’ll get a custom email address like SF-ER-\[yourtext]@yourdomain.salesmate.io.The “SF-ER” part is fixed, but you can pick a custom word (3-20 characters, using letters, numbers, hyphens, or dots).
* **Name**: Give the trigger a name that matches its purpose (e.g., “Order Emails”).
* **Description**: Add a short note to explain what the trigger does.
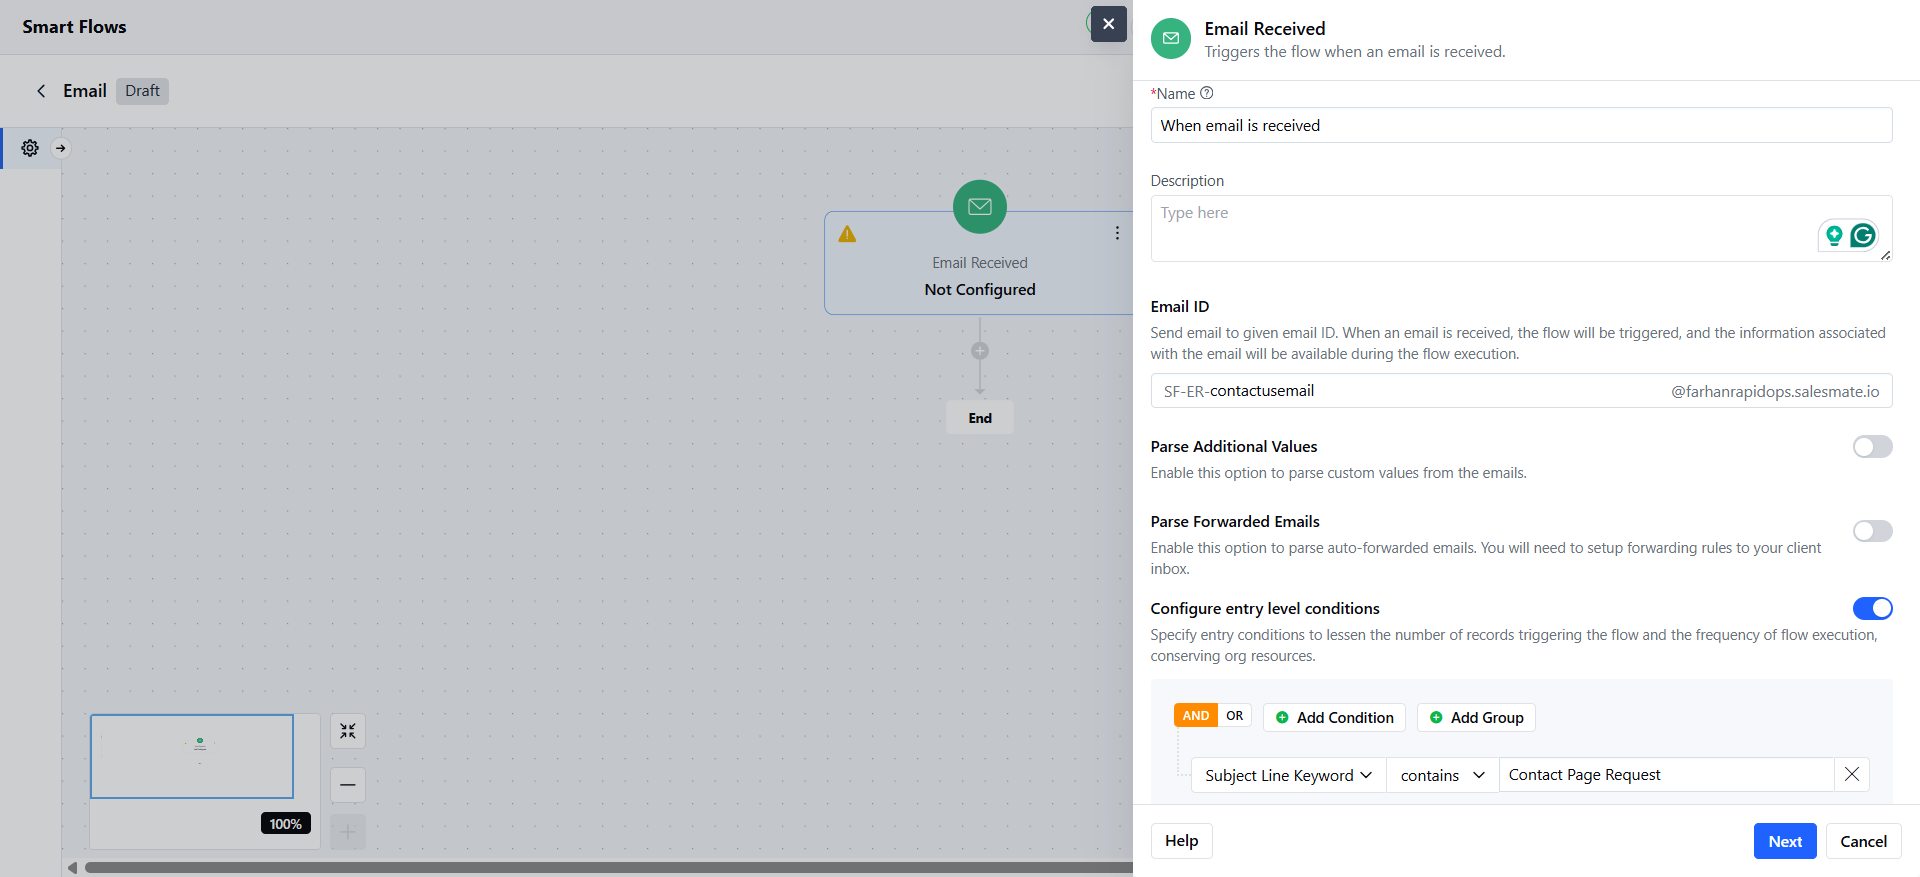 * *Parse Additional Values*\*: Turn this on to pull specific details from the email, like an order number. If enabled, you’ll have to set up parsing rules in the next step.
* **Parse Forwarded Emails**: Turn this on to grab details like the original sender’s name or email from forwarded messages. You can’t use this if Parse Additional Values is turned on.
* **Filter Conditions**: Set rules to trigger the flow only for certain emails (e.g., emails with “invoice” in the subject, from a specific sender, or with certain words in the body).
### Create Parsing Rules
If you turned on **Parse Additional Values**, here’s how to set up parsing:**Send a Test Email**:
Send an email to your parser address. You can copy the address from the screen.The system saves the last 3 non-test emails, listed from newest to oldest.
* **Pick an Email**: Choose one email from the list to set up data extraction.
* *Parse Additional Values*\*: Turn this on to pull specific details from the email, like an order number. If enabled, you’ll have to set up parsing rules in the next step.
* **Parse Forwarded Emails**: Turn this on to grab details like the original sender’s name or email from forwarded messages. You can’t use this if Parse Additional Values is turned on.
* **Filter Conditions**: Set rules to trigger the flow only for certain emails (e.g., emails with “invoice” in the subject, from a specific sender, or with certain words in the body).
### Create Parsing Rules
If you turned on **Parse Additional Values**, here’s how to set up parsing:**Send a Test Email**:
Send an email to your parser address. You can copy the address from the screen.The system saves the last 3 non-test emails, listed from newest to oldest.
* **Pick an Email**: Choose one email from the list to set up data extraction.
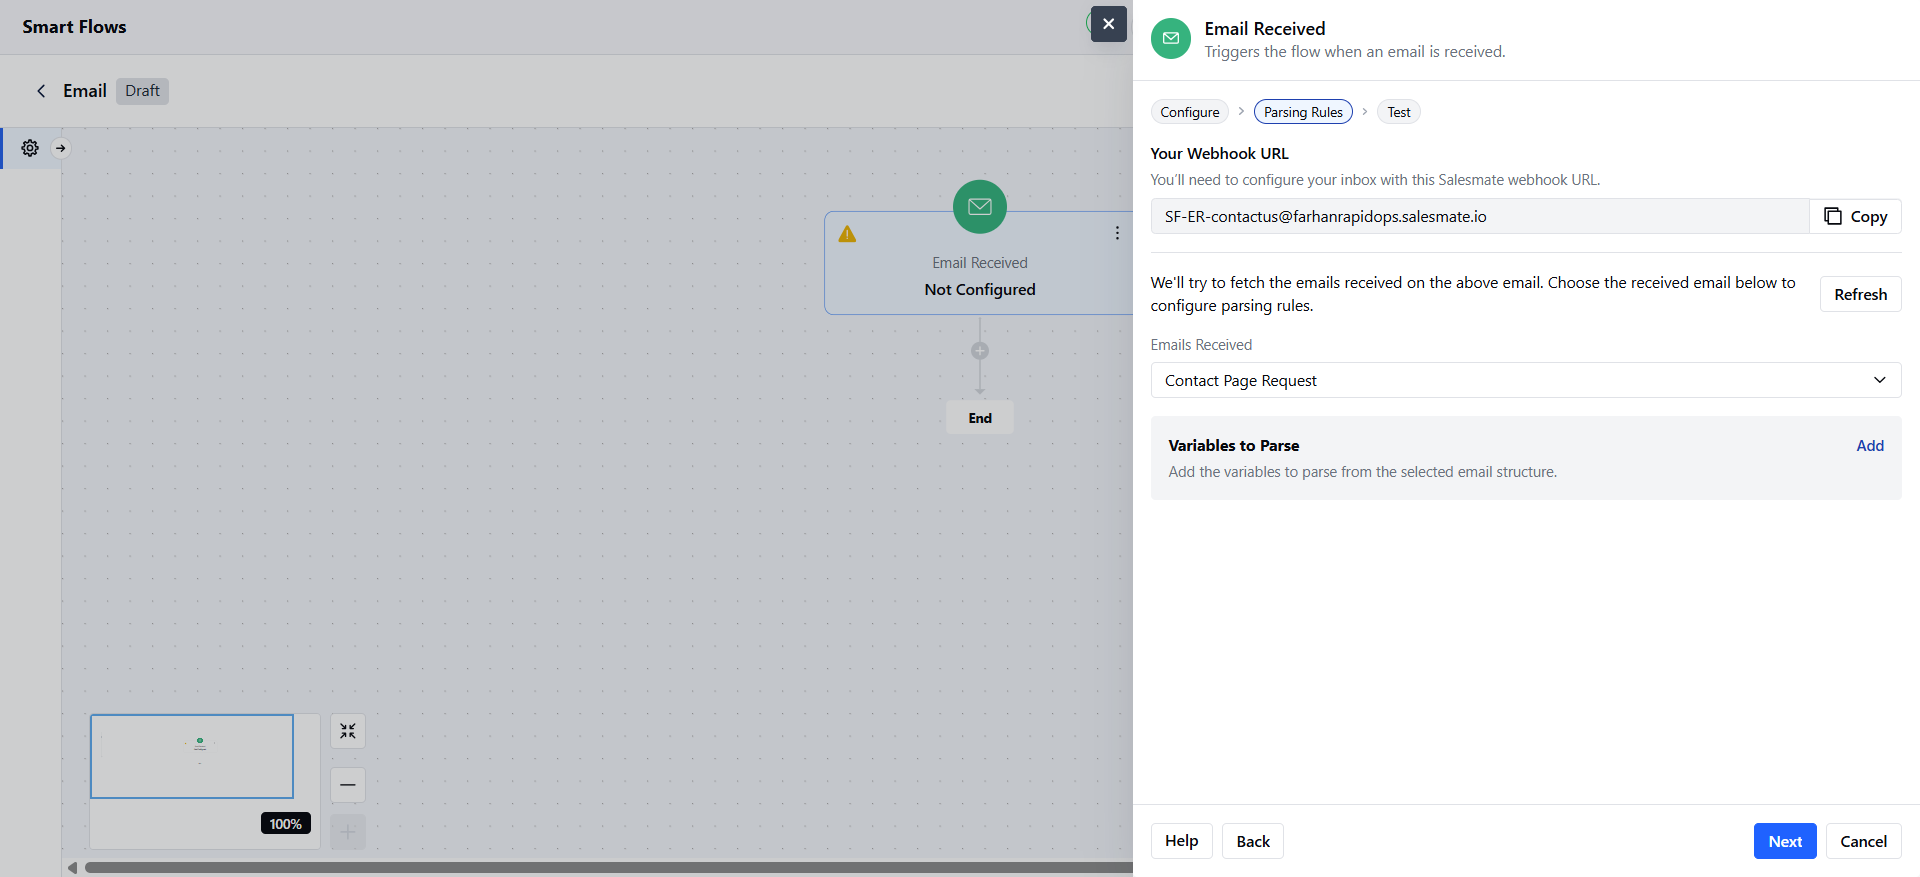 * *Map Variables*\*: Highlight text in the email to extract (e.g., “12345” from “Order ID: 12345”).
* **Advanced Options**:**Extract Part of Text**: Pull only part of the highlighted text (e.g., “$100” from “Total: $100.00”).
* **DOM Path (CSS Selector)**: Use a selector to pinpoint data.
* **Content Path (XPath)**: Use a path as a backup.
* **Text Position**: Set start and end points for the text you want.
* **Review Variables**: You can see all mapped variables in a list on the right. You can edit or delete them using the **X** icon. To change mappings, click **Modify** to update or pick a different email, which re-parses the data.
* **Save**: Save your variable mappings. You can’t edit variable names later; delete and recreate them if needed.
### Data Available in Your Flow
When the flow starts, you can use these email details:
Sender NameSender Email AddressCC and BCC AddressesSubjectEmail Body (HTML and plain text)Received Date and TimeThread IDForwarded Sender Name and EmailParsed Variables
### Practical Use Cases
Create a lead (contact) in Salesmate when someone emails your support inbox.Start a support ticket for emails with words like “urgent” or “refund.”Parse the email signature in emails to create a contact in Salesmate.
* *Map Variables*\*: Highlight text in the email to extract (e.g., “12345” from “Order ID: 12345”).
* **Advanced Options**:**Extract Part of Text**: Pull only part of the highlighted text (e.g., “$100” from “Total: $100.00”).
* **DOM Path (CSS Selector)**: Use a selector to pinpoint data.
* **Content Path (XPath)**: Use a path as a backup.
* **Text Position**: Set start and end points for the text you want.
* **Review Variables**: You can see all mapped variables in a list on the right. You can edit or delete them using the **X** icon. To change mappings, click **Modify** to update or pick a different email, which re-parses the data.
* **Save**: Save your variable mappings. You can’t edit variable names later; delete and recreate them if needed.
### Data Available in Your Flow
When the flow starts, you can use these email details:
Sender NameSender Email AddressCC and BCC AddressesSubjectEmail Body (HTML and plain text)Received Date and TimeThread IDForwarded Sender Name and EmailParsed Variables
### Practical Use Cases
Create a lead (contact) in Salesmate when someone emails your support inbox.Start a support ticket for emails with words like “urgent” or “refund.”Parse the email signature in emails to create a contact in Salesmate.